A Hands-On Guide to Active Directory Enumeration and Modification with ldap3
Overview :
In this blog, we’ll embark on a journey into the world of LDAP (Lightweight Directory Access Protocol) and Active Directory. But here’s the twist – no pre-existing tools like ldapsearch, ldapmodify, impacket, or bloodhound will be our guide. Instead, we’ll roll up our sleeves and create a simple yet powerful tool using Python3 and ldap3.
Why create our tool?
Because understanding the mechanics behind the tools we use is essential. Many cybersecurity enthusiasts jump straight into using tools without unraveling the magic behind them. This blog aims to demystify the process, empowering you to interact with LDAP directly and comprehend the intricacies of Active Directory enumeration, information retrieval, and object modification.
What’s on the agenda?
We’ll cover everything from establishing a connection to Active Directory using ldap3, searching for users and groups, to modifying and adding objects like a pro. By the end, you’ll not only grasp how these operations are performed but also be equipped to create your own LDAP-interacting tools from scratch.
So, buckle up as we dive into the realm of LDAP and Active Directory, where you’ll emerge with the skills to navigate and manipulate directories with confidence. Let’s begin this journey, empowering you to be the master of your tools and the architect of your cybersecurity strategies.
Introduction to ldap3 :
ldap3 is a Python library for interacting with LDAP (Lightweight Directory Access Protocol) servers. It provides a convenient and Pythonic way to perform LDAP operations, such as querying, adding, modifying, and deleting entries in LDAP directories.
Installation :
You can download and install ldap3 directly from its GitHub source :
https://github.com/cannatag/ldap3
and then
1
python setup.py install
Or install the ldap3 library directly from pyPI:
1
pip3 install ldap3
Active directory Environment :
Assuming you’ve installed Windows Server and configured Active Directory, ensure LDAP access is set up. If you’re unfamiliar with this process, refer to my previous post, Active Directory Mastery - A Guide to Windows Server Setup for Penetration Testing. Once your environment is ready, let’s Connecting to Active Directory with Python and ldap3
Connecting to Active Directory with Python and ldap3 :
Importing Object
we need to imports 3 specific components from the ldap3 module:
Server: Represents an LDAP server like ldap://ex.example.com
Connection: Represents a connection to an LDAP server.
SAFE_SYNC: Represents a synchronous (blocking) connection mode with safety checks. ALL: To retrieve all info about entries
1
from ldap3 import Server, Connection, ALL
Now, we’ve imported the essential namespaces, Server and Connection. In the LDAP protocol, authentication is referred to as Bind which I explained in my LDAP post. You can refer to it for more details. In LDAP, there are three types of Bind connections: Anonymous Bind, Simple Password Bind, and SASL.
Let’s start with the anonymous bind
Anonymous Bind :
Let’s start accessing the server with an anonymous bind:
1
2
3
4
>>> from ldap3 import Server, Connection, ALL
>>> srv = Server("emsec.emsec.htb")
>>> conn = Connection(srv, auto_bind=True)
so if we Displays information about the connection object, showing details like server host, port, authentication method, etc.
1
2
3
>>> conn
Connection(server=Server(host='emsec.emsec.htb', port=389, use_ssl=False, allowed_referral_hosts=[('*', True)], get_info='SCHEMA', mode='IP_V6_PREFERRED'), auto_bind='NO_TLS', version=3, authentication='ANONYMOUS', client_strategy='SYNC', auto_referrals=True, check_names=True, read_only=False, lazy=False, raise_exceptions=False, fast_decoder=True, auto_range=True, return_empty_attributes=True, auto_encode=True, auto_escape=True, use_referral_cache=False)
>>>
I want you to know that there are four connection strategies: SYNC, ASYNC, RESTARTABLE, and REUSABLE. In our case, we’re using SYNC, as indicated in the conn result with client_strategy='SYN'C. This is the default strategy, which means the client waits for the server’s response before proceeding with further operations.
also we Prints information about the Server object, showing details like host, port, and SSL usage the same way we do with connection :
1
2
>>> srv
Server(host='emsec.emsec.htb', port=389, use_ssl=False, allowed_referral_hosts=[('*', True)], get_info='SCHEMA', mode='IP_V6_PREFERRED')
1
2
3
4
>>> print(conn)
ldap://emsec.emsec.htb:389 - cleartext - user: None - not lazy - bound - open - <local: 10.10.10.40:53937 - remote: 10.10.10.10:389> - tls not started - listening - SyncStrategy - internal
decoder
>>>
From the print(conn) result, we observed that it’s a cleartext connection, which is the type the server is currently listening to. We’ll explore how to switch to SSL and how to use secure ldap later.
- LDAP Connection Details
| Syntax | Description |
|---|---|
| Supported LDAP Versions | Server supports LDAP 2 and 3 |
| Naming Contexts | Server stores information for 3 different DIT partitions |
| Alternative Servers | This is the only replica of the database |
| Supported Controls | Optional controls that can be sent in a request operation |
| Supported Extensions | Additional extended operations understood by the server |
| Supported SASL Mechanisms | Different additional SASL authentication mechanisms |
| Schema Entry | The location of the schema in the DIT |
| Vendor Name | The brand/mark/name of this LDAP server |
| Vendor Version | The version of this LDAP server |
Getting Information from the server (Anonymous Bind):
I should note that we are currently in an Anonymous Bind, attempting to gather information from the server.
but first we need to specify the get_info=ALL parameter indicates that when establishing a connection, the client should request all available information about the LDAP server.
also the auto_bind=True which indicates that the connection should be automatically established upon creation.
1
2
3
4
5
6
7
8
9
10
11
12
13
14
15
16
17
18
19
20
21
22
23
24
25
26
27
28
29
30
31
32
33
34
35
36
37
38
39
40
41
42
43
44
45
46
47
48
49
50
51
52
53
54
55
56
57
58
59
60
61
62
63
64
65
66
67
68
69
70
71
72
73
74
75
76
77
78
79
80
81
82
83
84
85
86
87
88
89
90
91
92
93
94
95
96
97
98
99
100
101
102
103
104
105
106
107
108
109
110
111
112
113
114
115
116
117
118
119
120
121
122
123
>>> server = Server('emsec.emsec.htb',  get_info=ALL)
>>> conn = Connection(server, auto_bind=True)
>>> server.info
DSA info (from DSE):
  Supported LDAP versions: 3, 2
  Naming contexts:
    DC=emsec,DC=htb
    CN=Configuration,DC=emsec,DC=htb
    CN=Schema,CN=Configuration,DC=emsec,DC=htb
    DC=DomainDnsZones,DC=emsec,DC=htb
    DC=ForestDnsZones,DC=emsec,DC=htb
  Supported controls:
    1.2.840.113556.1.4.1338 - Verify name - Control - MICROSOFT
    1.2.840.113556.1.4.1339 - Domain scope - Control - MICROSOFT
    1.2.840.113556.1.4.1340 - Search options - Control - MICROSOFT
    1.2.840.113556.1.4.1341 - RODC DCPROMO - Control - MICROSOFT
    1.2.840.113556.1.4.1413 - Permissive modify - Control - MICROSOFT
    1.2.840.113556.1.4.1504 - Attribute scoped query - Control - MICROSOFT
    1.2.840.113556.1.4.1852 - User quota - Control - MICROSOFT
    1.2.840.113556.1.4.1907 - Server shutdown notify - Control - MICROSOFT
    1.2.840.113556.1.4.1948 - Range retrieval no error - Control - MICROSOFT
    1.2.840.113556.1.4.1974 - Server force update - Control - MICROSOFT
    1.2.840.113556.1.4.2026 - Input DN - Control - MICROSOFT
    1.2.840.113556.1.4.2064 - Show recycled - Control - MICROSOFT
    1.2.840.113556.1.4.2065 - Show deactivated link - Control - MICROSOFT
    1.2.840.113556.1.4.2066 - Policy hints [DEPRECATED] - Control - MICROSOFT
    1.2.840.113556.1.4.2090 - DirSync EX - Control - MICROSOFT
    1.2.840.113556.1.4.2204 - Tree deleted EX - Control - MICROSOFT
    1.2.840.113556.1.4.2205 - Updates stats - Control - MICROSOFT
    1.2.840.113556.1.4.2206 - Search hints - Control - MICROSOFT
    1.2.840.113556.1.4.2211 - Expected entry count - Control - MICROSOFT
    1.2.840.113556.1.4.2239 - Policy hints - Control - MICROSOFT
    1.2.840.113556.1.4.2255 - Set owner - Control - MICROSOFT
    1.2.840.113556.1.4.2256 - Bypass quota - Control - MICROSOFT
    1.2.840.113556.1.4.2309
    1.2.840.113556.1.4.2330
    1.2.840.113556.1.4.2354
    1.2.840.113556.1.4.319 - LDAP Simple Paged Results - Control - RFC2696
    1.2.840.113556.1.4.417 - LDAP server show deleted objects - Control - MICROSOFT
    1.2.840.113556.1.4.473 - Sort Request - Control - RFC2891
    1.2.840.113556.1.4.474 - Sort Response - Control - RFC2891
    1.2.840.113556.1.4.521 - Cross-domain move - Control - MICROSOFT
    1.2.840.113556.1.4.528 - Server search notification - Control - MICROSOFT
    1.2.840.113556.1.4.529 - Extended DN - Control - MICROSOFT
    1.2.840.113556.1.4.619 - Lazy commit - Control - MICROSOFT
    1.2.840.113556.1.4.801 - Security descriptor flags - Control - MICROSOFT
    1.2.840.113556.1.4.802 - Range option - Control - MICROSOFT
    1.2.840.113556.1.4.805 - Tree delete - Control - MICROSOFT
    1.2.840.113556.1.4.841 - Directory synchronization - Control - MICROSOFT
    1.2.840.113556.1.4.970 - Get stats - Control - MICROSOFT
    2.16.840.1.113730.3.4.10 - Virtual List View Response - Control - IETF
    2.16.840.1.113730.3.4.9 - Virtual List View Request - Control - IETF
  Supported extensions:
    1.2.840.113556.1.4.1781 - Fast concurrent bind - Extension - MICROSOFT
    1.2.840.113556.1.4.2212 - Batch request - Extension - MICROSOFT
    1.3.6.1.4.1.1466.101.119.1 - Dynamic Refresh - Extension - RFC2589
    1.3.6.1.4.1.1466.20037 - StartTLS - Extension - RFC4511-RFC4513
    1.3.6.1.4.1.4203.1.11.3 - Who am I - Extension - RFC4532
  Supported features:
    1.2.840.113556.1.4.1670 - Active directory V51 - Feature - MICROSOFT
    1.2.840.113556.1.4.1791 - Active directory LDAP Integration - Feature - MICROSOFT
    1.2.840.113556.1.4.1935 - Active directory V60 - Feature - MICROSOFT
    1.2.840.113556.1.4.2080 - Active directory V61 R2 - Feature - MICROSOFT
    1.2.840.113556.1.4.2237 - Active directory W8 - Feature - MICROSOFT
    1.2.840.113556.1.4.800 - Active directory - Feature - MICROSOFT
  Supported SASL mechanisms:
    GSSAPI, GSS-SPNEGO, EXTERNAL, DIGEST-MD5
  Schema entry:
    CN=Aggregate,CN=Schema,CN=Configuration,DC=emsec,DC=htb
Other:
  domainFunctionality:
    7
  forestFunctionality:
    7
  domainControllerFunctionality:
    7
  rootDomainNamingContext:
    DC=emsec,DC=htb
  ldapServiceName:
    emsec.htb:emsec$@EMSEC.HTB
  isGlobalCatalogReady:
    TRUE
  supportedLDAPPolicies:
    MaxPoolThreads
    MaxPercentDirSyncRequests
    MaxDatagramRecv
    MaxReceiveBuffer
    InitRecvTimeout
    MaxConnections
    MaxConnIdleTime
    MaxPageSize
    MaxBatchReturnMessages
    MaxQueryDuration
    MaxDirSyncDuration
    MaxTempTableSize
    MaxResultSetSize
    MinResultSets
    MaxResultSetsPerConn
    MaxNotificationPerConn
    MaxValRange
    MaxValRangeTransitive
    ThreadMemoryLimit
    SystemMemoryLimitPercent
  serverName:
    CN=EMSEC,CN=Servers,CN=Default-First-Site-Name,CN=Sites,CN=Configuration,DC=emsec,DC=htb
  schemaNamingContext:
    CN=Schema,CN=Configuration,DC=emsec,DC=htb
  isSynchronized:
    TRUE
  highestCommittedUSN:
    323702
  dsServiceName:
    CN=NTDS Settings,CN=EMSEC,CN=Servers,CN=Default-First-Site-Name,CN=Sites,CN=Configuration,DC=emsec,DC=htb
  dnsHostName:
    emsec.emsec.htb
  defaultNamingContext:
    DC=emsec,DC=htb
  currentTime:
    20240114142516.0Z
  configurationNamingContext:
    CN=Configuration,DC=emsec,DC=htb
With server.info, we successfully retrieved information about the LDAP server using the info attribute of the Server object. However, our result is limited since we are binding as anonymous. We’ll find more useful information with Simple Password Bind and SASL Bind.
Simple Password :
Simply put, with a Simple Password Bind, you provide a DN (Distinguished Name) and a password. The server then checks the validity of the credentials and either permits or denies access to the elements of the DIT (Directory Information Tree). On the other hand, for SASL Bind, we use an external certificate or a Kerberos ticket to identify the user.
Note : The Directory Information Tree (DIT) is a hierarchical tree structure that organizes entries within a directory server. It is a fundamental concept in LDAP (Lightweight Directory Access Protocol) and represents the organization of directory entries.
Here’s an example of the syntax for a DIT:
1
2
cn=John Doe,ou=Users,dc=emsec,dc=htb
Simple Authentication and Security Layer (SASL) :
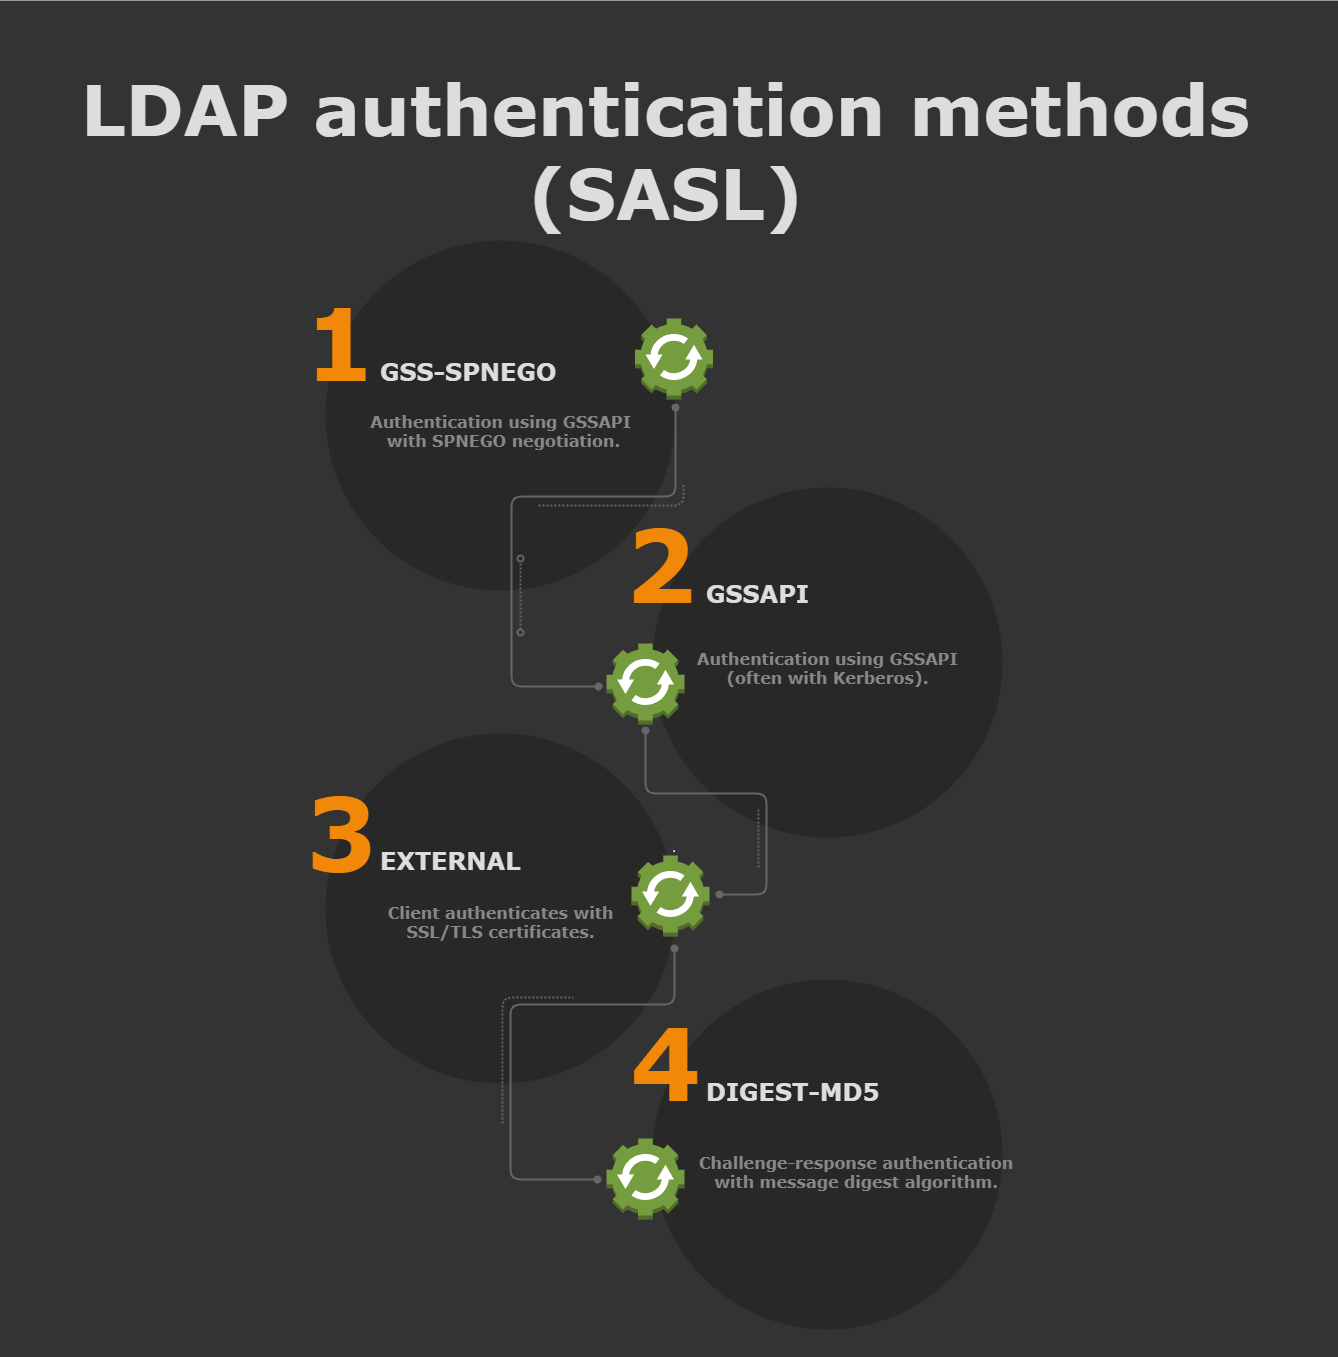
SASL is a framework for authentication, it allows client and server to negotiate an authentication method among those supported. SASL authentication adds 4 authentication subtypes:
GSS-SPNEGO: Simple and ProtectedGSSAPINegotiation Mechanism, yet another protocol to negotiate authentication. Active Directory providesNTLMorKerberosas underlaying methods.GSSAPI: Kerberos (GSSAPI is often used with Kerberos, a widely used authentication protocol that provides strong authentication and security features.)EXTERNAL: SASL EXTERNAL is a Simple Authentication and Security Layer mechanism that enables a client to authenticate itself to a server using credentials provided by the underlying transport layer, such asSSL/TLScertificates.DIGEST-MD5: Challenge-response authentication with message digest algorithm.
Logging into the server :
1
2
3
4
5
6
>>> from ldap3 import Server, Connection, ALL
>>> server = Server('emsec.emsec.htb', get_info=ALL)
>>> conn = Connection(server, 'user4', 'Password@123!', auto_bind=True)
>>> conn.extend.standard.who_am_i()
'u:EMSEC0\\user4'
>>>
we checks that we are a valid user using who_am_i() and this extended operation returns our identity u:EMSEC0\\user4
Note: if you get empty response from conn.extend.standard.who_am_i() .This means you have no authentication status on the server, so you are an anonymous user.
Establishing a secure connection :
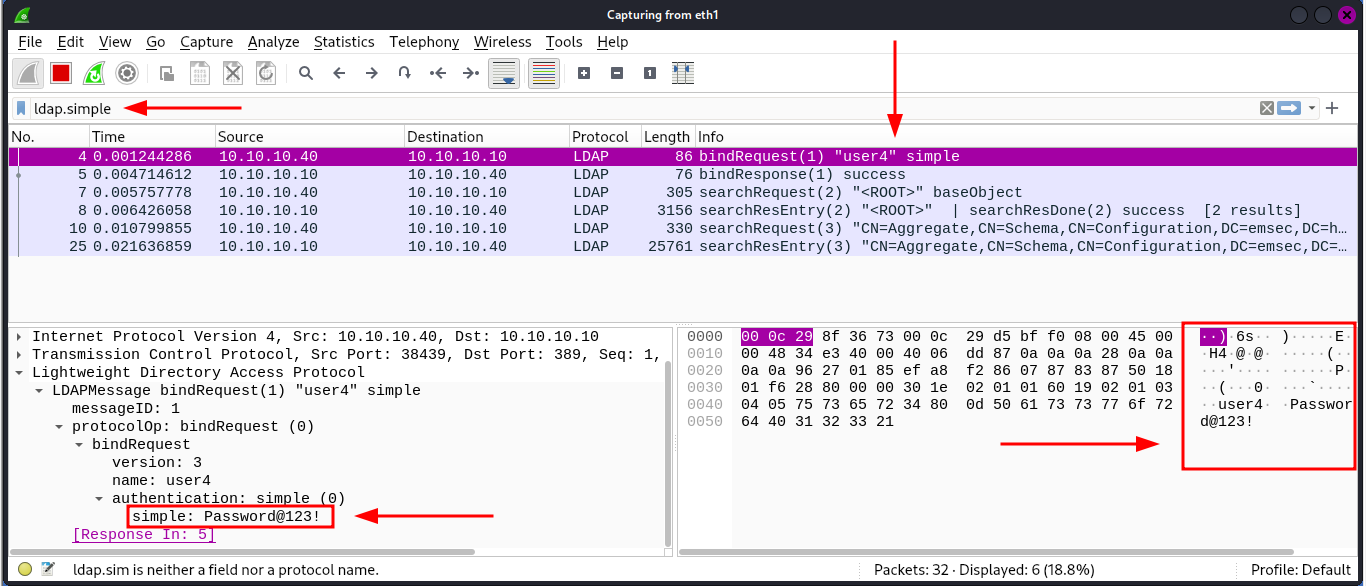
Previously, we used print(conn) to view the details of our connection, and it showed cleartext ,This means that credentials pass unencrypted over the wire (insecure LDAP: port 389). Also this raises concerns about the potential for password capture by anyone in the same network using tools like Wireshark, Such as shown below.
The LDAP protocol provides two ways to secure a connection: LDAP over TLS and the StartTLS extended operation. Both methods establish a secure TLS connection: the former secure with TLS the communication channel as soon as the connection is open, while the latter can be used at any time on an already open unsecure connection to secure it issuing the StartTLS operation.
1
2
3
4
5
6
>>> from ldap3 import Server, Connection, ALL
>>> server  = Server("emsec.emsec.htb",use_ssl=True,get_info=ALL)
>>> conn = Connection(server, 'user4','Password@123!', auto_bind=True)
>>> tls_result = conn.start_tls()
>>> print(conn)
ldaps://emsec.emsec.htb:636 - ssl - user: user4 - not lazy - bound - open - <local: 10.10.10.40:43075 - remote: 10.10.10.10:636> - tls not started - listening - SyncStrategy - internal decoder
Now, upon checking with print(conn), we observe ssl instead of cleartext, indicating that we are now using a secure connection. However, TLS hasn’t started. This is because we haven’t specified any TLS options, and thus, there is no checking of certificate validity. To customize TLS behavior, you can provide a Tls object to the Server object (ldap3.Tls )
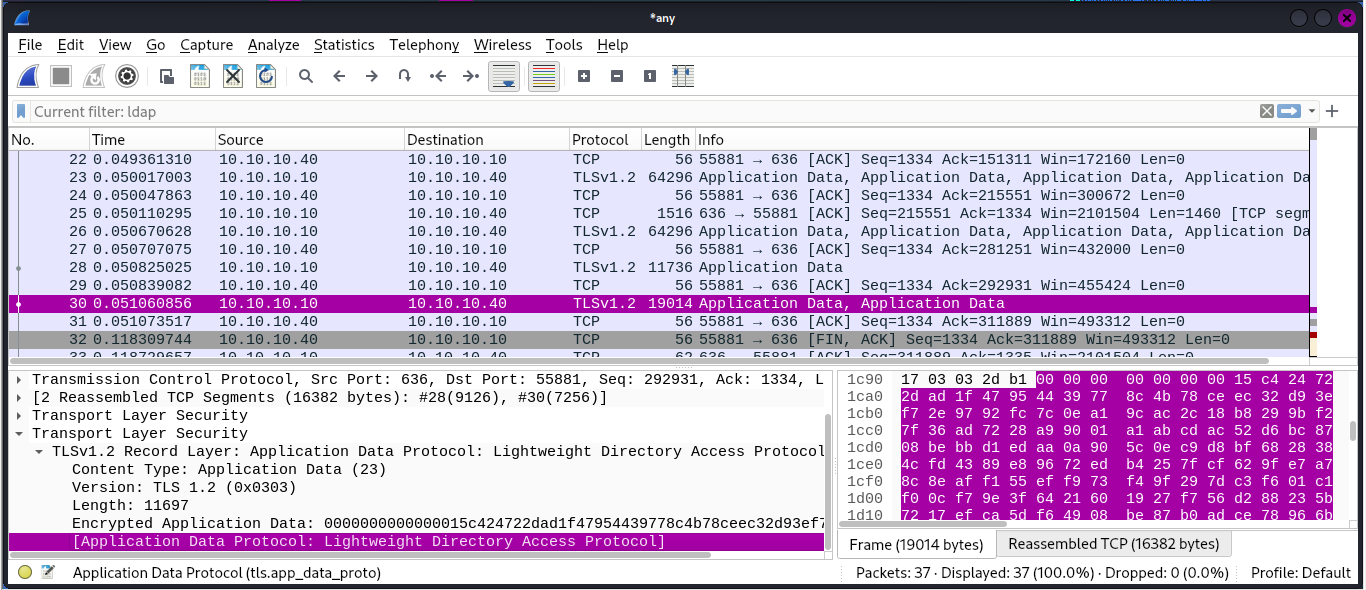
Now with encrypted connections (SSL) a network sniffer can’t capture passwords or any other sensitive data:
Searching for Users and Groups :
uppose we need to enumerate LDAP using the ldap3 library. Before we begi n, it’s important to note that to find entries in the DIT, you must use the Search operation. However, there are two mandatory parameters for the search operation: search_base which denotes the location in the DIT where the search will start, and search_filter a string that describes what you are searching for
Dump All Users :
1
2
3
4
5
>>> from ldap3 import Server, Connection, ALL
>>> conn = Connection(server, 'user4', 'Password@123!', auto_bind=True)
>>> conn.search('dc=emsec,dc=htb', '(objectclass=person)')
True
>>> conn.entries
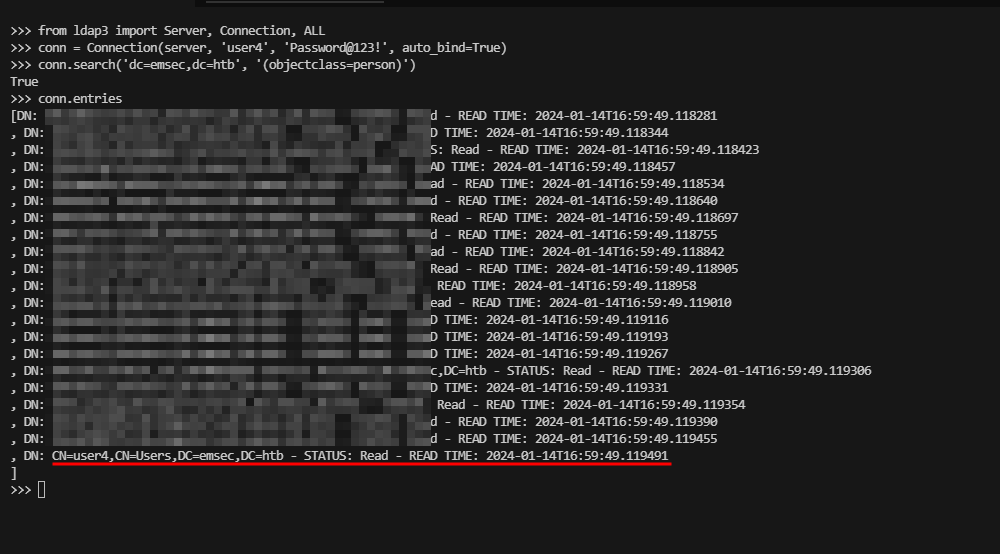
Here, we are requesting all entries of the class person. This will display all users on our Windows server.
This operation is looking for entries in the LDAP directory that match the specified search criteria
1
conn.search('dc=emsec,dc=emsec,dc=htb', '(objectclass=person)')
dc=emsec,dc=emsec,dc=htb : This specifies the starting point in the LDAP directory tree for the search.
(objectclass=person) : This filter defines the conditions that entries must meet to be considered a match. In this case, it’s looking for entries with the objectClass attribute set to person.
Dump All Groups :
To dump users, we can simply change the filter from '(objectclass=person)' to '(objectclass=group)' This modification will retrieve all groups in the domain.
1
2
3
4
5
6
7
8
9
10
11
12
13
14
15
16
17
18
19
>>> conn.search('dc=emsec,dc=htb', '(objectclass=groups)')
True
>>> conn.entries
[DN: CN=Administrators,CN=Builtin,DC=emsec,DC=htb - STATUS: Read - READ TIME: 2024-01-14T17:10:13.712388
, DN: CN=Users,CN=Builtin,DC=emsec,DC=htb - STATUS: Read - READ TIME: 2024-01-14T17:10:13.712492
, DN: CN=Guests,CN=Builtin,DC=emsec,DC=htb - STATUS: Read - READ TIME: 2024-01-14T17:10:13.712630
, DN: CN=Print Operators,CN=Builtin,DC=emsec,DC=htb - STATUS: Read - READ TIME: 2024-01-14T17:10:13.712682
, DN: CN=Backup Operators,CN=Builtin,DC=emsec,DC=htb - STATUS: Read - READ TIME: 2024-01-14T17:10:13.712723
, DN: CN=Replicator,CN=Builtin,DC=emsec,DC=htb - STATUS: Read - READ TIME: 2024-01-14T17:10:13.712827
, DN: CN=Remote Desktop Users,CN=Builtin,DC=emsec,DC=htb - STATUS: Read - READ TIME: 2024-01-14T17:10:13.714688
, DN: CN=Network Configuration Operators,CN=Builtin,DC=emsec,DC=htb - STATUS: Read - READ TIME: 2024-01-14T17:10:13.714765
, DN: CN=Performance Monitor Users,CN=Builtin,DC=emsec,DC=htb - STATUS: Read - READ TIME: 2024-01-14T17:10:13.714820
, DN: CN=Performance Log Users,CN=Builtin,DC=emsec,DC=htb - STATUS: Read - READ TIME: 2024-01-14T17:10:13.714872
, DN: CN=Distributed COM Users,CN=Builtin,DC=emsec,DC=htb - STATUS: Read - READ TIME: 2024-01-14T17:10:13.714922
, DN: CN=IIS_IUSRS,CN=Builtin,DC=emsec,DC=htb - STATUS: Read - READ TIME: 2024-01-14T17:10:13.714971
, DN: CN=Cryptographic Operators,CN=Builtin,DC=emsec,DC=htb - STATUS: Read - READ TIME: 2024-01-14T17:10:13.715019
, DN: CN=Event Log Readers,CN=Builtin,DC=emsec,DC=htb - STATUS: Read - READ TIME: 2024-01-14T17:10:13.715107
, DN: CN=Certificate Service DCOM Access,CN=Builtin,DC=emsec,DC=htb - STATUS: Read - READ TIME: 2024-01-14T17:10:13.715157
, DN: CN=RDS Remote Access Servers,CN=Builtin,DC=emsec,DC=htb - STATUS: Read - READ TIME: 2024-01-14T17:10:13.715203
You can dump every object using various filters.
Adding Users and Groups :
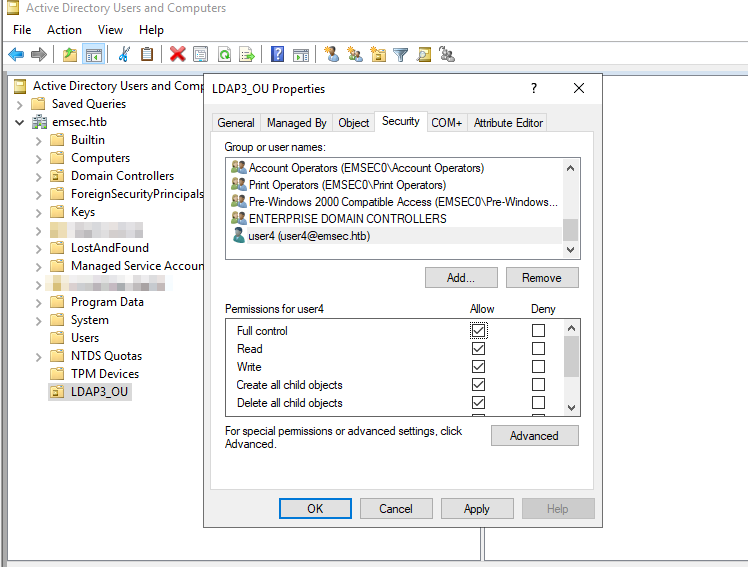
To add or modify Users, groups or Organizational Unit one must have administrator privileges or the necessary permissions. I have already granted user4 the permission to add users and groups.
To clarify the permissions granted to user4, I have given them full control over the LDAP3_OU:
Add new user to organizational unit :
To search for all OU’s that it in the domain we use this filter :
1
2
3
4
5
6
7
8
>>>conn.search('dc=emsec,dc=htb','(objectclass=organizationalUnit)')
True
>>> conn.entries
[DN: OU=Domain Controllers,DC=emsec,DC=htb - STATUS: Read - READ TIME: 2024-01-14T20:36:46.101068
, DN: OU=XXX,DC=emsec,DC=htb - STATUS: Read - READ TIME: 2024-01-14T20:36:46.101115
, DN: OU=XXX,DC=emsec,DC=htb - STATUS: Read - READ TIME: 2024-01-14T20:36:46.101142
, DN: OU=LDAP3_OU,DC=emsec,DC=htb - STATUS: Read - READ TIME: 2024-01-14T20:36:46.101167
]
Now Let’s try to add users to LDAP3_OU
1
2
3
4
5
6
7
8
>>> from ldap3 import Server,Connection,ALL
>>> server = Server('emsec.emsec.htb')
>>> conn = Connection(server,'user4','Password@123!',auto_bind=True)
>>> conn.add('cn=Test_user,ou=LDAP3_OU,dc=emsec,dc=htb', 'user', {'givenName': 'TestName', 'sn': 'Test', 'departmentNumber': 'Test', 'telephoneNumber': 1111})
True
>>> conn.result
{'result': 0, 'description': 'success', 'dn': '', 'message': '', 'referrals': None, 'type': 'addResponse'}
>>>
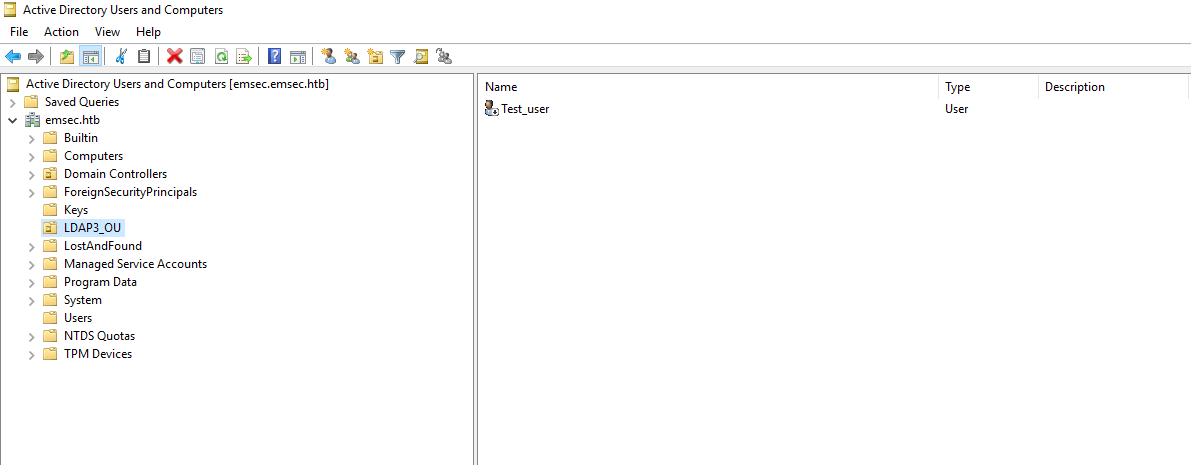
As you can see, we have successfully added ‘Test_user’ to the ‘LDAP3_OU’ Organizational Unit. This occurred because we have full control permission over the OU.
Note:When creating a user, you can specify additional attributes such as description, mail, and more. We will explore this further in the modify entry section
Add group to organizational unit :
As we saw earlier, to convert an entry from a user to a group, we simply need to change the objectClass attribute from user to group
1
2
3
4
5
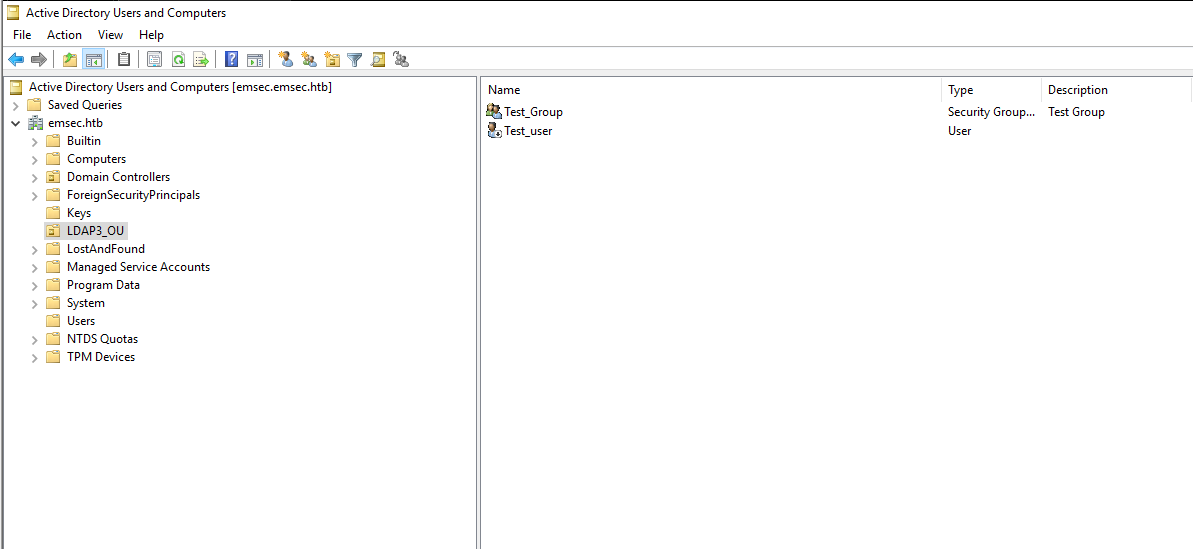
>>> conn.add('cn=Test_Group,ou=LDAP3_OU,dc=emsec,dc=htb', 'group', {'cn': 'Test_Group','description': 'Test Group'})
True
>>> conn.result
{'result': 0, 'description': 'success', 'dn': '', 'message': '', 'referrals': None, 'type': 'addResponse'}
>>>
Add user to group :
As an administrator, I have granted user4 permission to add users to the Test_Group. This means we can accomplish this task using only user4.
Rename,Modify,Update an entry :
Make sure to import the necessary namespaces MODIFY_ADD, MODIFY_REPLACE, and MODIFY_DELETE. With these imported, you can then modify, rename, and update an entry as needed.
1
>>> from ldap3 import MODIFY_ADD, MODIFY_REPLACE, MODIFY_DELETE
Rename an entry :
Renaming an entry in LDAP means changing its RDN (Relative Distinguished Name)
1
2
3
4
5
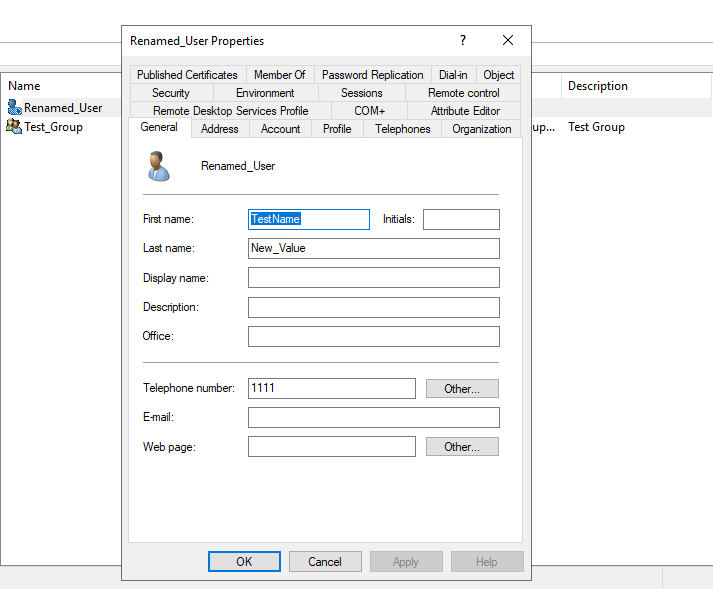
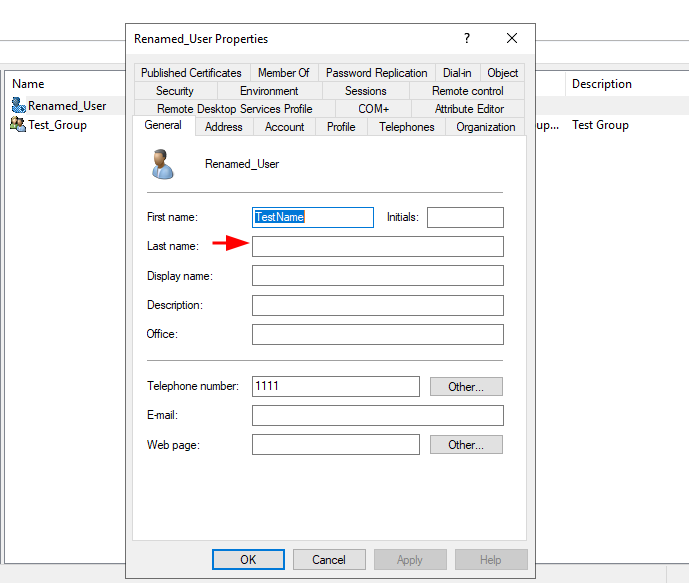
>>> conn.modify_dn('cn=Test_user,ou=LDAP3_OU,dc=emsec,dc=htb', 'cn=Renamed_User')
True
>>> conn.result
{'result': 0, 'description': 'success', 'dn': '', 'message': '', 'referrals': None, 'type': 'modDNResponse'}
>>>
Update an entry :
In this section, we will change attributes such as mail, description, and more. To do this, make sure to import the necessary namespaces MODIFY_ADD, MODIFY_REPLACE, and MODIFY_DELETE, as mentioned previously. Now, let’s proceed to update the attributes of our user Renamed_user.”
1
2
>>> conn.modify('cn=Renamed_User,ou=LDAP3_OU,dc=emsec,dc=htb', {'sn': [(MODIFY_REPLACE, ['New_Value'])]})
True
To delete the updated value :
1
2
>>> conn.modify('cn=Renamed_User,ou=LDAP3_OU,dc=emsec,dc=htb', {'sn': [(MODIFY_DELETE, ['New_Value'])]})
True
We have successfully deleted the sn attribute of our user
Building my Tool NexusAD :
The NexusAD tool, available on GitHub, is designed to simplify Active Directory management tasks. While the tool covers a range of functionalities, I want to emphasize that it’s created solely for fun and learning. In this blog post, I’ll share some screenshots of the tool in action. The code is open for exploration and modification. Feel free to upgrade and customize the tool based on your needs. Let’s run the tool and have some fun with Active Directory management!
You can find the complete source code on nexusAD.py
How to use this simple tool ?
Simply run the command python3 nexusAD.py -h to see the available functionalities of this tool :
1
2
3
4
5
6
7
8
9
10
11
12
13
14
15
16
17
18
19
20
21
22
23
24
25
26
┌──(root㉿emsec)-[/opt/nexusAd]
└─# python3 nexusAD.py -h
usage: nexusAD.py [-h] -domain DOMAIN -u USERNAME -p PASSWORD -dc DOMAIN_CONTROLLER -sf SEARCH_FILTER [-add-user ADD_USER] [-add-group ADD_GROUP] [-add-ou ADD_OU]
                  [-modify-object MODIFY_OBJECT] [-delete-object DELETE_OBJECT]

LDAP Tool

options:
  -h, --help            show this help message and exit
  -domain DOMAIN        Domain name, e.g., example.com
  -u USERNAME, --username USERNAME
                        Username
  -p PASSWORD, --password PASSWORD
                        Password
  -dc DOMAIN_CONTROLLER, --domain-controller DOMAIN_CONTROLLER
                        Domain Controller IP
  -sf SEARCH_FILTER, --search-filter SEARCH_FILTER
                        Specify the LDAP search filter. For example, '(&(objectClass=user)(sAMAccountName=jdoe))'.
  -add-user ADD_USER    Add a new user
  -add-group ADD_GROUP  Add a new group
  -add-ou ADD_OU        Add a new Organizational Unit (OU)
  -modify-object MODIFY_OBJECT
                        Modify an LDAP object
  -delete-object DELETE_OBJECT
                        Delete an object, e.g., CN=emsec,CN=users,DC=example,DC=com
Note: The -modify-object option is not currently functional. Consider it a next step to implement this feature in your tool. As mentioned before, this tool was created just for fun and learning purposes.
Tool Options :
- add user :
1
2
3
4
5
6
7
┌──(root㉿emsec)-[/opt/nexusAd]
└─# python3 nexusAD.py -domain emsec.htb -u admin -p Password@123! -dc 10.10.10.10 -add-user fun_user
[*] Successfully connected to LDAP server at ldap://10.10.10.10

[+] User fun_user added successfully.

User Path : cn=fun_user,cn=users,dc=emsec,dc=htb
- add group :
1
2
3
4
5
6
7
┌──(root㉿emsec)-[/opt/nexusAd]
└─# python3 nexusAD.py -domain emsec.htb -u admin -p Password@123! -dc 10.10.10.10  -add-group fun_group
[*] Successfully connected to LDAP server at ldap://10.10.10.10

[+] Group fun_group added successfully.

User Path : cn=fun_group,cn=users,dc=emsec,dc=htb
- add organizational unit :
1
2
3
4
5
6
7
8
9
10
┌──(root㉿emsec)-[/opt/nexusAd]
└─# python3 nexusAD.py -domain emsec.htb -u admin -p Password@123! -dc 10.10.10.10  -add-ou fun_ou
[*] Successfully connected to LDAP server at ldap://10.10.10.10

ou=fun_ou,dc=emsec,dc=htb
[*] Creatr OU :

[+] Ou fun_ou added successfully.

Ou Path : ou=fun_ou,dc=emsec,dc=htb
- dump all users :
You use this LDAP Search Filter Cheatsheet
1
2
3
4
5
6
7
8
9
10
11
12
13
14
15
16
17
18
19
20
21
22
23
┌──(root㉿emsec)-[/opt/nexusAd]
└─# python3 nexusAD.py -domain emsec.htb -u admin -p Password@123! -dc 10.10.10.10 -sf '(objectclass=person)'
[*] Successfully connected to LDAP server at ldap://10.10.10.10

[*] Search results for filter '(objectclass=person)':

[*] DN: CN=Administrator,CN=Users,DC=emsec,DC=htb
[*] DN: CN=Guest,CN=Users,DC=emsec,DC=htb
[*] DN: CN=EMSEC,OU=Domain Controllers,DC=emsec,DC=htb
[*] DN: CN=krbtgt,CN=Users,DC=emsec,DC=htb
[*] DN: CN=Amanda Walker,CN=Users,DC=emsec,DC=htb
[*] DN: CN=winrm_svc,CN=Users,DC=emsec,DC=htb
[*] DN: CN=user1,CN=Users,DC=emsec,DC=htb
[*] DN: CN=user2,CN=Users,DC=emsec,DC=htb
[*] DN: CN=user3,CN=Users,DC=emsec,DC=htb
[*] DN: CN=user4,CN=Users,DC=emsec,DC=htb
[*] DN: CN=Renamed_User,OU=LDAP3_OU,DC=emsec,DC=htb
[*] DN: CN=lol,OU=LDAP3_OU,DC=emsec,DC=htb
[*] DN: CN=user9,CN=Users,DC=emsec,DC=htb
[*] DN: CN=user10,CN=Users,DC=emsec,DC=htb
[*] DN: CN=admin,CN=Users,DC=emsec,DC=htb
[*] DN: CN=user11,CN=Users,DC=emsec,DC=htb
[*] DN: CN=fun_user,CN=Users,DC=emsec,DC=htb
- dump all group :
1
2
3
4
5
6
7
8
9
10
11
12
13
14
15
16
17
18
19
┌──(root㉿emsec)-[/opt/nexusAd]
└─# python3 nexusAD.py -domain emsec.htb -u admin -p Password@123! -dc 10.10.10.10 -sf '(objectclass=group)'
[*] Successfully connected to LDAP server at ldap://10.10.10.10

[*] Search results for filter '(objectclass=group)':

[*] DN: CN=Administrators,CN=Builtin,DC=emsec,DC=htb
[*] DN: CN=RAS and IAS Servers,CN=Users,DC=emsec,DC=htb
[*] DN: CN=Server Operators,CN=Builtin,DC=emsec,DC=htb
[*] DN: CN=Account Operators,CN=Builtin,DC=emsec,DC=htb
[*] DN: CN=Pre-Windows 2000 Compatible Access,CN=Builtin,DC=emsec,DC=htb
[*] DN: CN=Cloneable Domain Controllers,CN=Users,DC=emsec,DC=htb
[*] DN: CN=Protected Users,CN=Users,DC=emsec,DC=htb
[*] DN: CN=Key Admins,CN=Users,DC=emsec,DC=htb
[*] DN: CN=Enterprise Key Admins,CN=Users,DC=emsec,DC=htb
[*] DN: CN=DnsAdmins,CN=Users,DC=emsec,DC=htb
[*] DN: CN=DnsUpdateProxy,CN=Users,DC=emsec,DC=htb
[*] DN: CN=Test_Group,OU=LDAP3_OU,DC=emsec,DC=htb
[*] DN: CN=fun_group,CN=Users,DC=emsec,DC=htb
- delete objects :
1
2
3
4
5
6
┌──(root㉿emsec)-[/opt/nexusAd]
└─# python3 nexusAD.py -domain emsec.htb -u admin -p Password@123! -dc 10.10.10.10  -delete-object CN=fun_user,CN=Users,DC=emsec,DC=htb
[*] Successfully connected to LDAP server at ldap://10.10.10.10

[+] Object CN=fun_user,CN=Users,DC=emsec,DC=htb deleted successfully.
Conclusion :
In conclusion, this blog has equipped you to navigate and manipulate Active Directory through Python and ldap3. By understanding the intricacies of LDAP, you’re ready to build custom tools and elevate your cybersecurity capabilities. Empower yourself to be a master of your tools and strategies in the realm of Active Directory security.

