Automate Your VMware Lab with PowerShell
Managing VMware Workstation with PowerShell and vmrun
In many home labs, security labs, and development environments, VMware Workstation is the backbone of daily work. Most users rely on the GUI, but once your number of virtual machines grows, clicking through menus quickly becomes inefficient. This is where PowerShell automation with vmrun shines.
This article walks through practical, real-world techniques for managing VMware Workstation entirely from PowerShell. Everything here is based on hands-on usage: starting and stopping VMs, interacting with the guest OS, collecting output, and building small automation utilities that scale well for labs and testing environments.
Why Manage VMware from PowerShell?
Using PowerShell instead of the GUI gives you repeatability and control. Once a task is scripted, it becomes deterministic and fast. This is especially useful for:
- Rapidly spinning up or shutting down multiple lab machines
- Headless VM operation for performance and automation
- Running commands inside guest systems without manual login
- Collecting artifacts such as IP addresses, logs, or screenshots
- Building repeatable red-team / blue-team lab workflows
PowerShell turns VMware Workstation from a click-driven tool into a fully controllable hypervisor platform.
Preparing the Environment
VMware Workstation includes a CLI tool called vmrun.exe. To make it available in PowerShell, add it to your system PATH:
1
setx PATH "$env:PATH;C:\Program Files (x86)\VMware\VMware Workstation"
After reopening your terminal, verify access:
1
2
3
4
5
6
7
8
9
10
11
12
13
14
15
16
PS C:\Users\emsec-pc> vmrun

vmrun version 1.17.0.24995812

Usage: vmrun [AUTHENTICATION-FLAGS] COMMAND [PARAMETERS]


AUTHENTICATION-FLAGS
--------------------
These must appear before the command and any command parameters.

   -T <hostType> (ws|fusion||player)
   -vp <password for encrypted virtual machine>
   -gu <userName in guest OS>
   -gp <password in guest OS>
If the help menu appears, your environment is ready. You can see available authentication flags, commands, and options for interacting with your VMs.
Listing and Controlling Virtual Machines :
You can list all currently running virtual machines with a single command:
1
2
3
PS C:\Users\emsec-pc> vmrun list
Total running VMs: 0
PS C:\Users\emsec-pc>
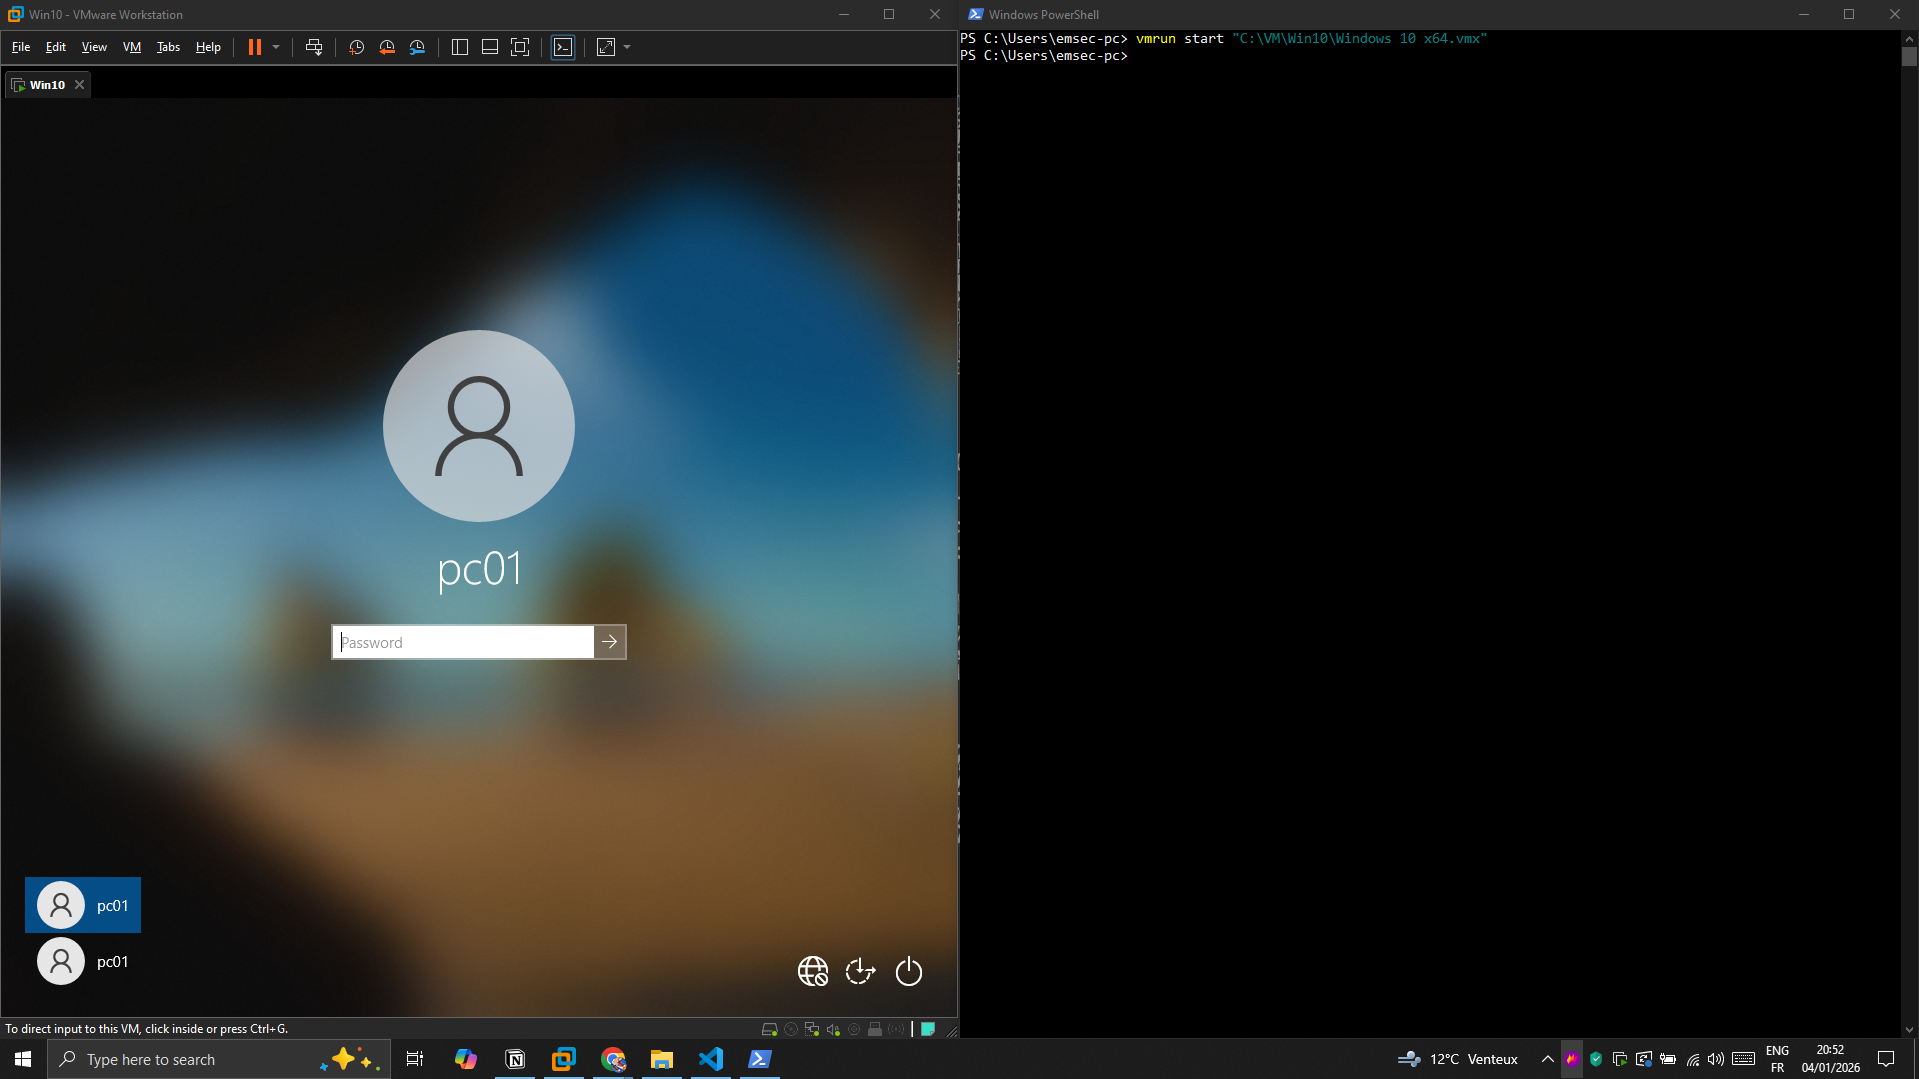
To start a VM:
1
vmrun start "C:\VM\Win10\Windows 10 x64.vmx"
We can run the VM in the background without a GUI, which is ideal for automation and saves system resources, simply by adding the nogui option:
1
vmrun start "C:\VM\Win10\Windows 10 x64.vmx" nogui
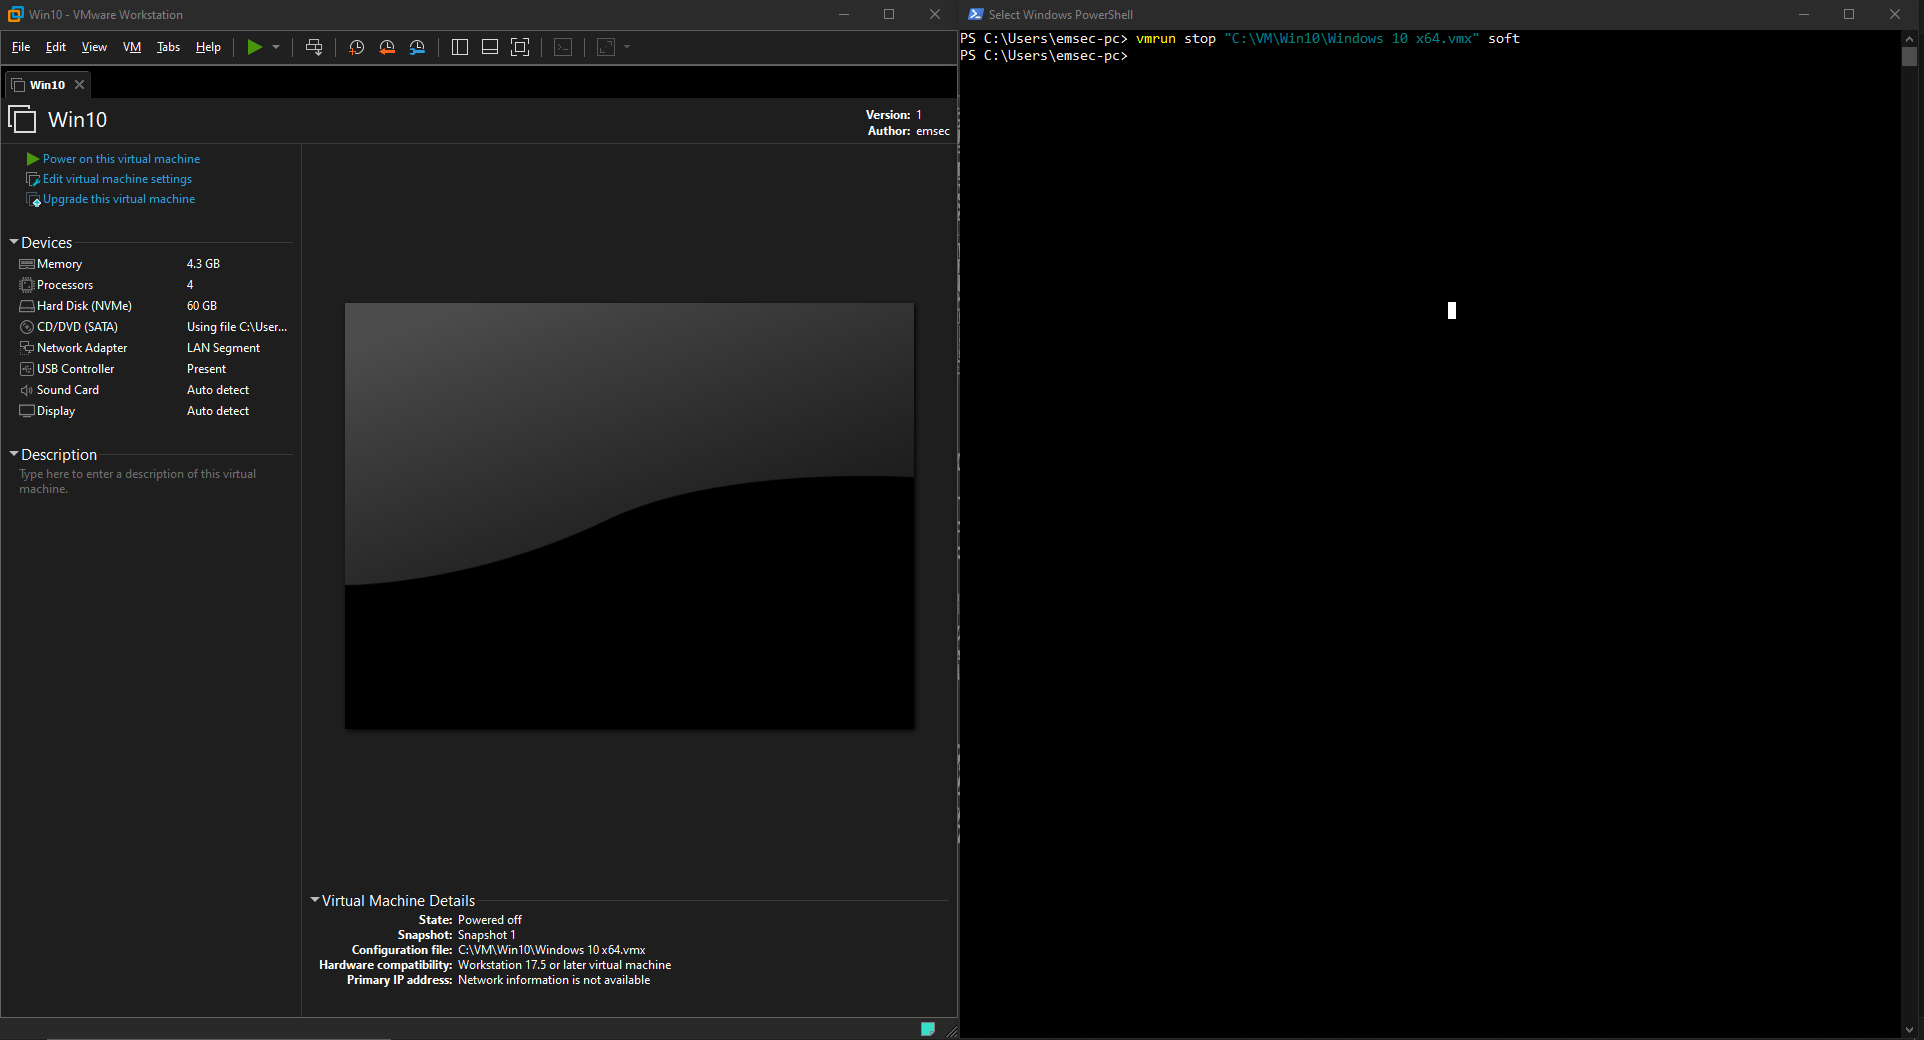
In the same way, we can stop a VM gracefully (soft shutdown):
1
vmrun stop "C:\VM\Win10\Windows 10 x64.vmx" soft
Suspending and resuming is often much faster than full shutdowns:
1
vmrun suspend "C:\VM\Win10\Windows 10 x64.vmx"
You can also reset a VM when needed:
1
vmrun -T ws reset "C:\VM\Win10\Windows 10 x64.vmx"
Checking VM Status Before Actions :
Before starting or interacting with a VM, it is good practice to verify whether it is already running.
1
2
3
PS C:\Users\emsec-pc> vmrun list | findstr /i "Windows 10 x64.vmx"
C:\VM\Win10\Windows 10 x64.vmx
PS C:\Users\emsec-pc>
This allows you to build condition-based scripts instead of blindly starting machines.
Interacting with the Guest Operating System
One of the most powerful features of vmrun is guest OS interaction. As long as VMware Tools is installed, you can execute commands inside the virtual machine. This is extremely useful when you have multiple VMs running at once and need to interact with a specific VM without opening its console or manually logging in.
With vmrun, you can authenticate using the guest operating system’s local username and password to run commands or manage processes
Listing processes inside the guest:
1
vmrun -T ws -gu pc01 -gp "Password@123!" listProcessesInGuest "C:\VM\Win10\Windows 10 x64.vmx"
1
2
3
4
5
6
7
8
9
10
11
12
13
14
15
16
17
18
19
20
21
22
23
24
25
26
27
28
29
30
31
32
33
34
35
36
37
38
39
40
PS C:\Users\emsec-pc> vmrun -T ws -gu pc01 -gp "Password@123!" listProcessesInGuest "C:\VM\Win10\Windows 10 x64.vmx"
Process list: 86
pid=0, owner=, cmd=[System Process]
pid=4, owner=NT AUTHORITY\SYSTEM, cmd=System
pid=108, owner=NT AUTHORITY\SYSTEM, cmd=Registry
pid=328, owner=NT AUTHORITY\SYSTEM, cmd=smss.exe
pid=452, owner=NT AUTHORITY\SYSTEM, cmd=csrss.exe
pid=532, owner=NT AUTHORITY\SYSTEM, cmd=wininit.exe
pid=540, owner=NT AUTHORITY\SYSTEM, cmd=csrss.exe
pid=612, owner=NT AUTHORITY\SYSTEM, cmd=services.exe
pid=640, owner=NT AUTHORITY\SYSTEM, cmd=winlogon.exe
pid=672, owner=NT AUTHORITY\SYSTEM, cmd=lsass.exe
pid=820, owner=NT AUTHORITY\SYSTEM, cmd=svchost.exe
pid=848, owner=Font Driver Host\UMFD-1, cmd=fontdrvhost.exe
pid=856, owner=Font Driver Host\UMFD-0, cmd=fontdrvhost.exe
pid=944, owner=NT AUTHORITY\NETWORK SERVICE, cmd=svchost.exe
# -------snipped-------
pid=3112, owner=NT AUTHORITY\SYSTEM, cmd=svchost.exe
pid=3256, owner=NT AUTHORITY\SYSTEM, cmd=vm3dservice.exe
pid=3328, owner=NT AUTHORITY\LOCAL SERVICE, cmd=svchost.exe
pid=3412, owner=NT AUTHORITY\LOCAL SERVICE, cmd=svchost.exe
pid=3828, owner=NT AUTHORITY\SYSTEM, cmd=dllhost.exe
pid=3972, owner=NT AUTHORITY\NETWORK SERVICE, cmd=WmiPrvSE.exe
pid=3340, owner=NT AUTHORITY\SYSTEM, cmd=SearchIndexer.exe
pid=3368, owner=NT AUTHORITY\SYSTEM, cmd=svchost.exe
pid=1128, owner=NT AUTHORITY\NETWORK SERVICE, cmd=msdtc.exe
pid=4480, owner=NT AUTHORITY\LOCAL SERVICE, cmd=NisSrv.exe
pid=4508, owner=NT AUTHORITY\SYSTEM, cmd=svchost.exe
pid=4892, owner=NT AUTHORITY\SYSTEM, cmd=svchost.exe
pid=4980, owner=NT AUTHORITY\SYSTEM, cmd=WmiPrvSE.exe
pid=5024, owner=NT AUTHORITY\SYSTEM, cmd=svchost.exe
pid=5064, owner=NT AUTHORITY\LOCAL SERVICE, cmd=svchost.exe
pid=5108, owner=NT AUTHORITY\LOCAL SERVICE, cmd=svchost.exe
pid=1244, owner=NT AUTHORITY\NETWORK SERVICE, cmd=svchost.exe
pid=3296, owner=NT AUTHORITY\SYSTEM, cmd=MicrosoftEdgeUpdate.exe
pid=4360, owner=NT AUTHORITY\SYSTEM, cmd=SgrmBroker.exe
pid=1252, owner=NT AUTHORITY\SYSTEM, cmd=svchost.exe
pid=2532, owner=NT AUTHORITY\SYSTEM, cmd=svchost.exe
pid=2996, owner=NT AUTHORITY\LOCAL SERVICE, cmd=svchost.exe
PS C:\Users\emsec-pc>
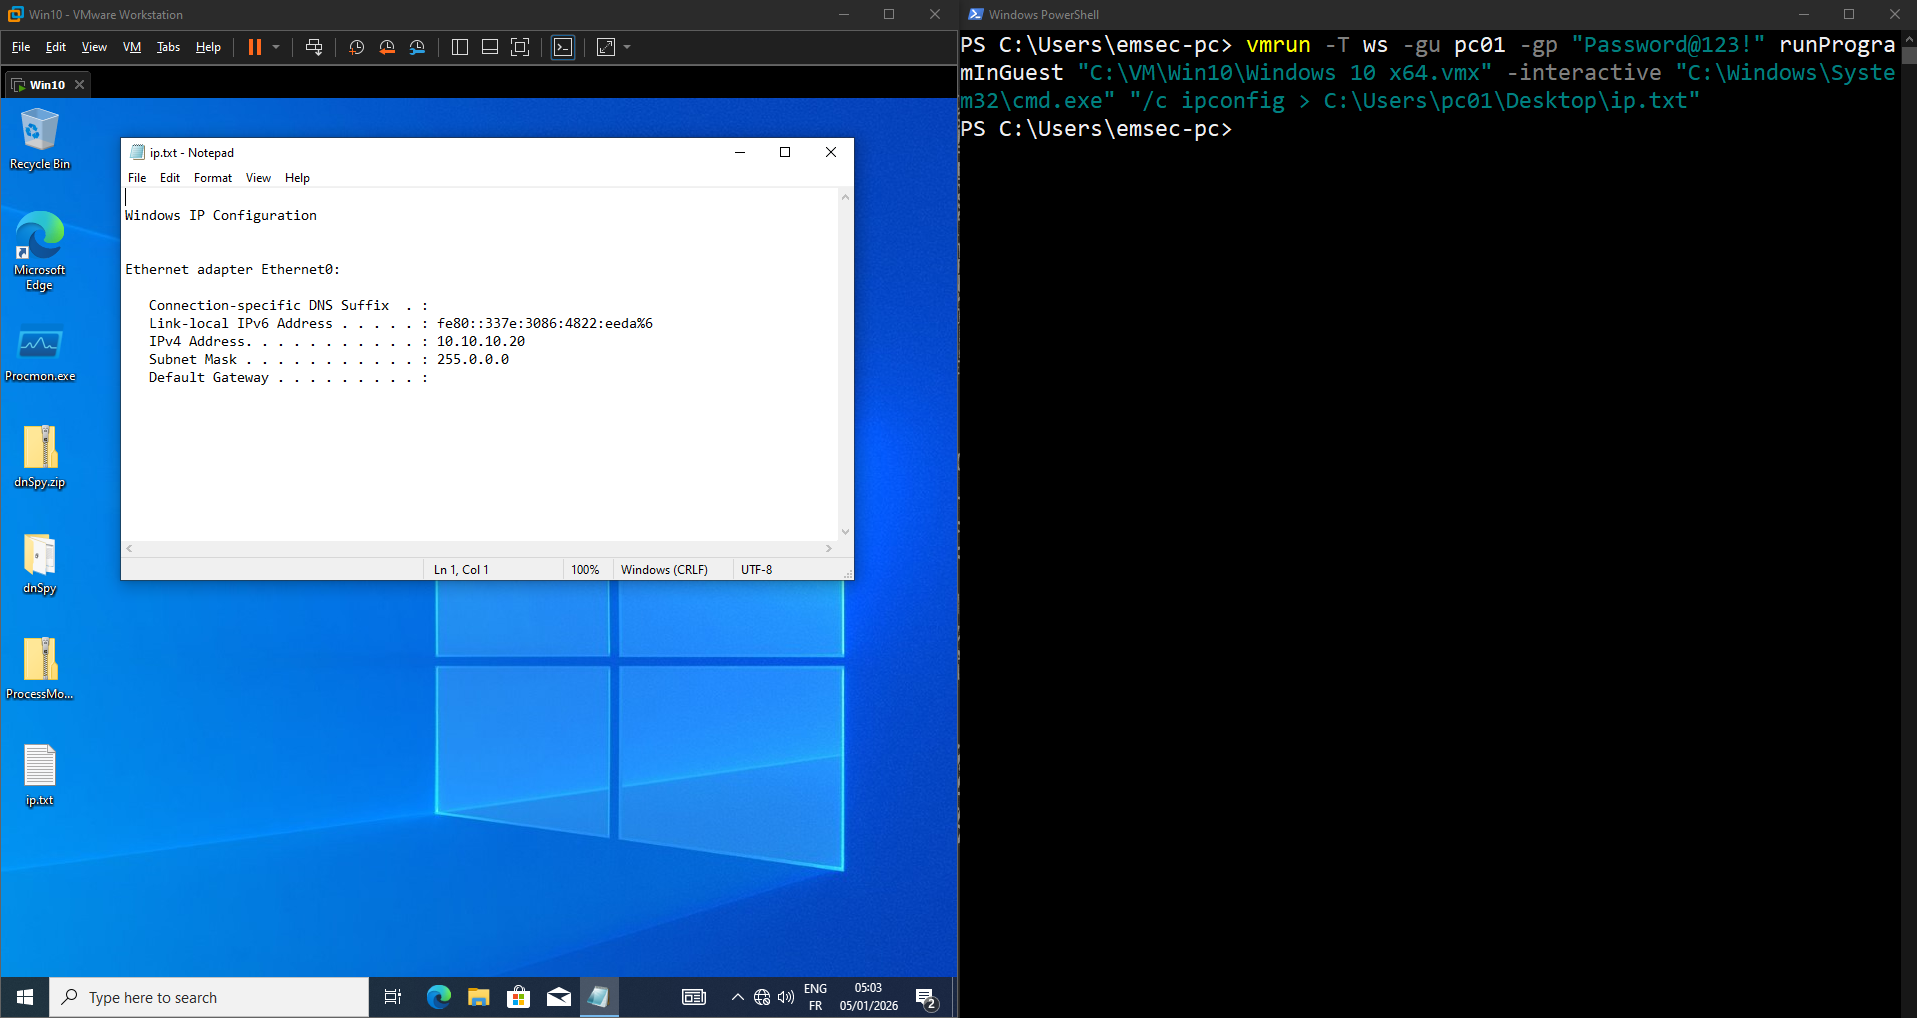
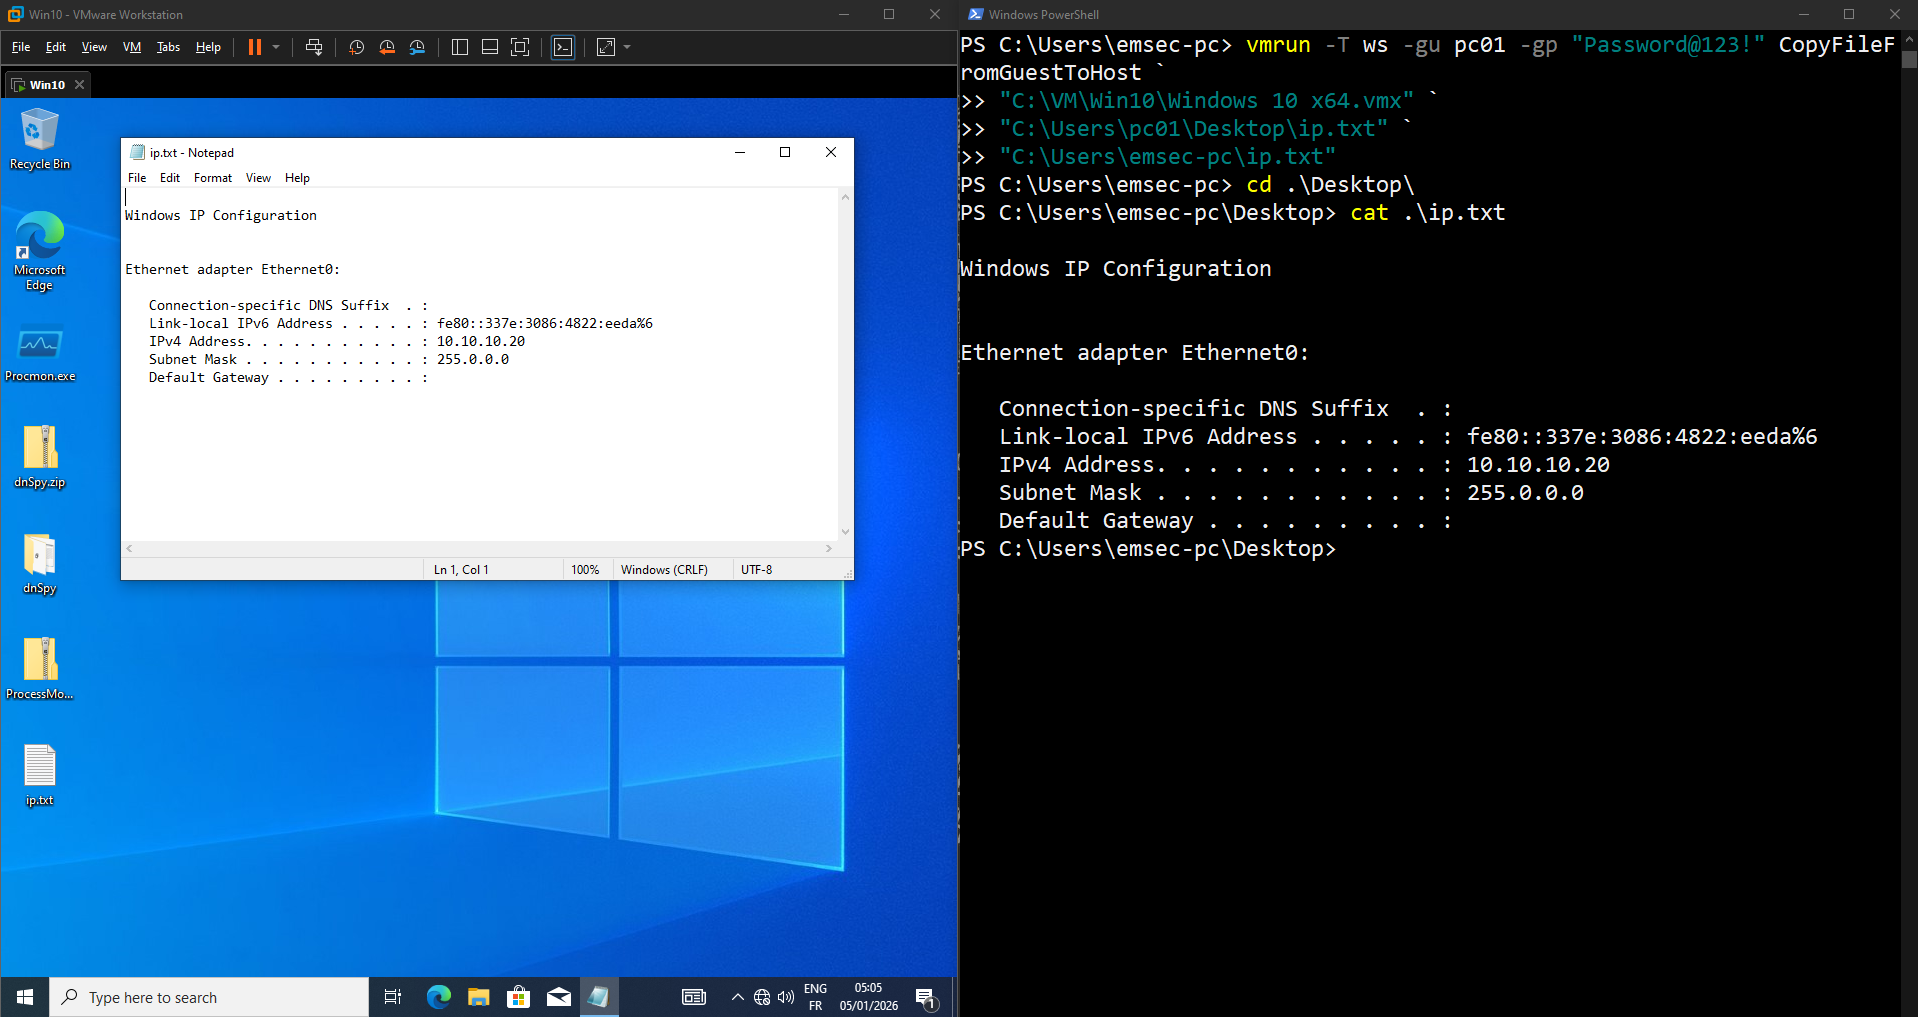
Running a command inside the guest and saving output:
1
vmrun -T ws -gu pc01 -gp "Password@123!" runProgramInGuest "C:\VM\Win10\Windows 10 x64.vmx" -interactive "C:\Windows\System32\cmd.exe" "/c ipconfig > C:\Users\pc01\Desktop\ip.txt"
Copying files from the guest back to the host is also useful when you need to transfer files from the VM:
1
2
3
4
vmrun -T ws -gu pc01 -gp "Password@123!" CopyFileFromGuestToHost `
"C:\VM\Win10\Windows 10 x64.vmx" `
"C:\Users\pc01\Desktop\ip.txt" `
"C:\Temp\ip_from_vm.txt"
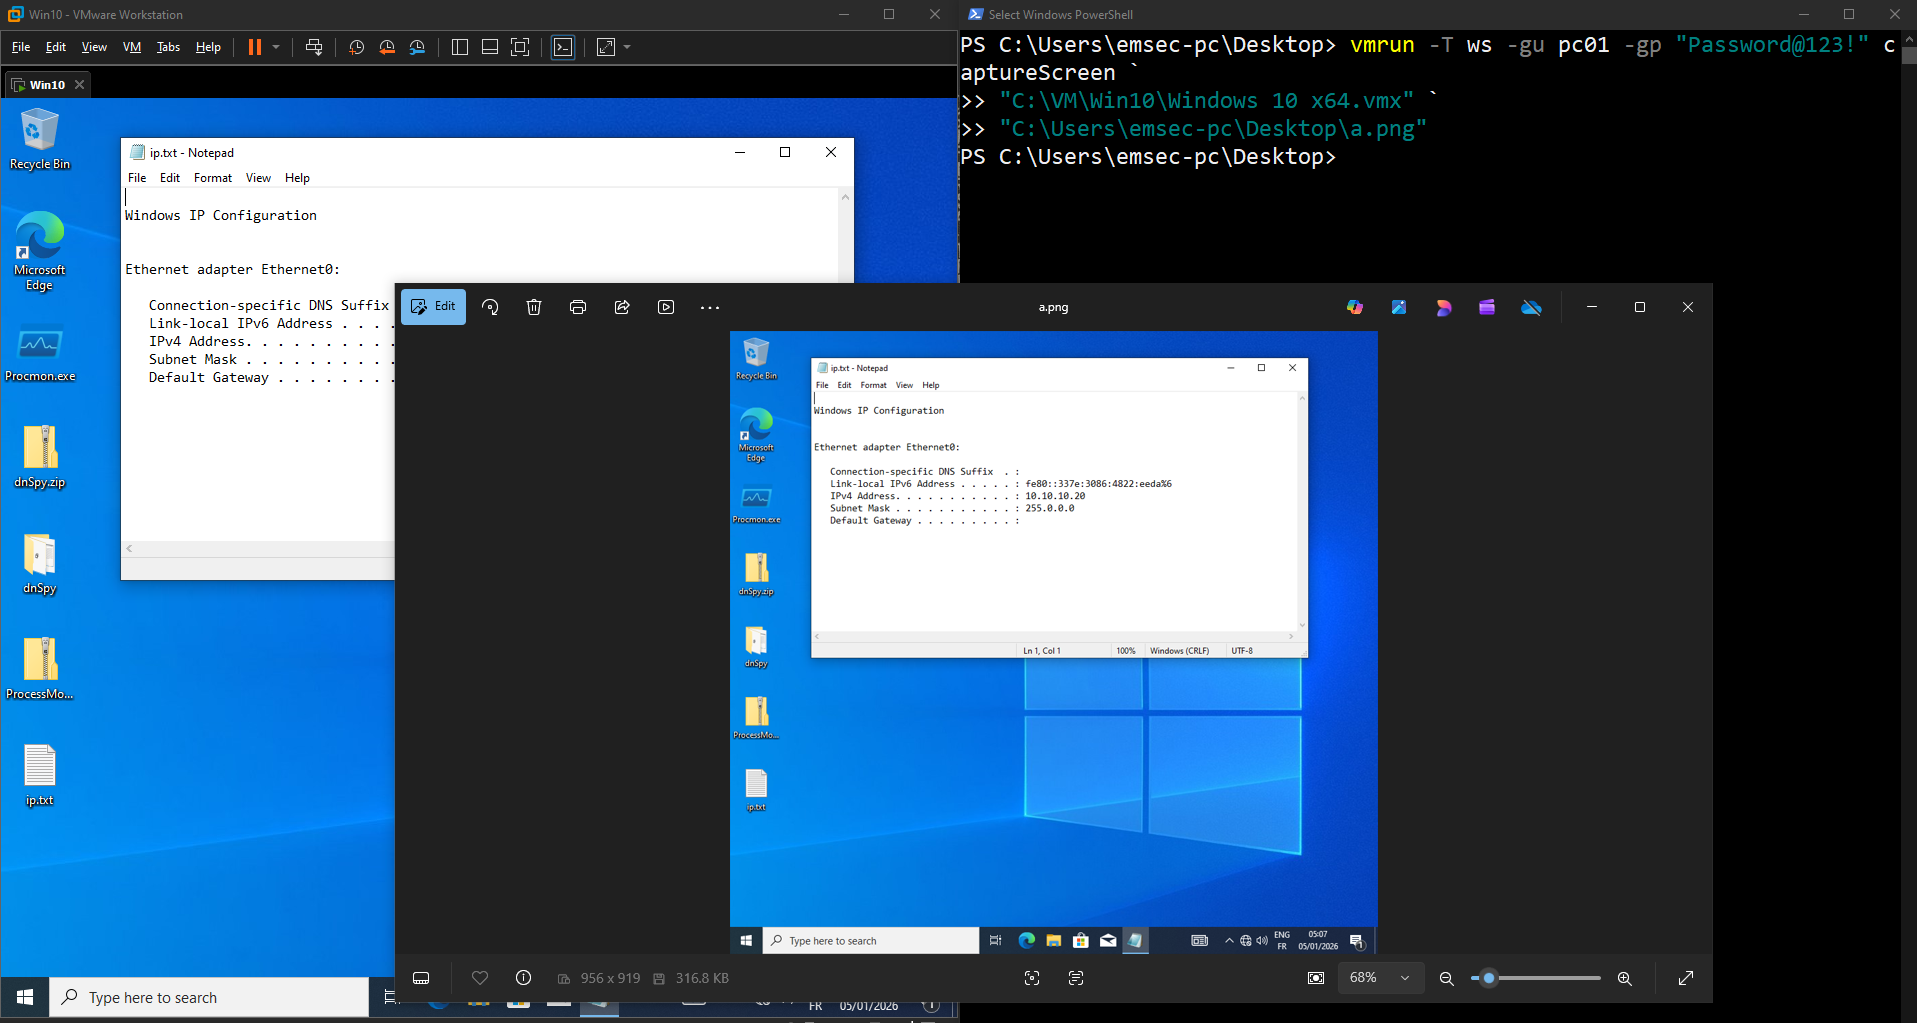
Capturing a screenshot of the guest VM:
1
2
3
vmrun -T ws -gu pc01 -gp "Password@123!" captureScreen `
"C:\VM\Win10\Windows 10 x64.vmx" `
"C:\Users\emsec-pc\Desktop\a.png"
Retrieving the VM IP address:
1
2
3
PS C:\Users\emsec-pc\Desktop> vmrun -T ws -gu pc01 -gp "Password@123!" getGuestIPAddress "C:\VM\Win10\Windows 10 x64.vmx"
10.10.10.20
PS C:\Users\emsec-pc\Desktop>
Terminating a specific process inside the VM :
For example, if we want to terminate the Calculator process from the host, we can first find its process ID (PID) and then terminate it using the killProcessInGuest option.

The PID of the Calculator program is 6760:
1
vmrun -T ws -gu pc01 -gp "Password@123!" killProcessInGuest "C:\VM\Win10\Windows 10 x64.vmx" 6760
![alt text]/assets/img/posts/vmware-lab-automation/(image-6.png)
Editing VM Configuration (.vmx Files)
VM properties like memory and CPU can be adjusted directly in the .vmx file. Always power off the VM first.
1
2
3
4
5
6
7
8
9
10
11
12
13
14
15
16
17
18
19
20
21
22
23
24
25
26
27
28
29
30
31
32
33
34
35
36
37
38
39
40
41
42
43
44
45
46
47
48
49
50
51
52
53
54
55
56
57
58
59
60
61
62
63
64
65
66
67
68
69
70
71
72
73
74
75
76
77
78
79
80
81
82
83
84
85
86
87
88
89
90
91
92
93
94
95
96
97
98
99
100
101
102
103
104
105
106
107
108
PS C:\Users\emsec-pc\Desktop> cat "C:\VM\Win10\Windows 10 x64.vmx"
.encoding = "windows-1252"
displayName = "Win10"
config.version = "8"
virtualHW.version = "21"
mks.enable3d = "TRUE"
pciBridge0.present = "TRUE"
pciBridge4.present = "TRUE"
pciBridge4.virtualDev = "pcieRootPort"
pciBridge4.functions = "8"
pciBridge5.present = "TRUE"
pciBridge5.virtualDev = "pcieRootPort"
pciBridge5.functions = "8"
pciBridge6.present = "TRUE"
pciBridge6.virtualDev = "pcieRootPort"
pciBridge6.functions = "8"
pciBridge7.present = "TRUE"
pciBridge7.virtualDev = "pcieRootPort"
pciBridge7.functions = "8"
vmci0.present = "TRUE"
hpet0.present = "TRUE"
nvram = "Windows 10 x64.nvram"
virtualHW.productCompatibility = "hosted"
powerType.powerOff = "soft"
powerType.powerOn = "soft"
powerType.suspend = "soft"
powerType.reset = "soft"
firmware = "efi"
sensor.location = "pass-through"
guestOS = "windows9-64"
tools.syncTime = "FALSE"
sound.autoDetect = "TRUE"
sound.virtualDev = "hdaudio"
sound.fileName = "-1"
sound.present = "TRUE"
numvcpus = "4"
cpuid.coresPerSocket = "2"
memsize = "4388"
mem.hotadd = "TRUE"
sata0.present = "TRUE"
nvme0.present = "TRUE"
nvme0:0.present = "TRUE"
usb.present = "TRUE"
ehci.present = "TRUE"
usb_xhci.present = "TRUE"
svga.graphicsMemoryKB = "8388608"
ethernet0.connectionType = "pvn"
ethernet0.addressType = "generated"
ethernet0.virtualDev = "e1000e"
ethernet0.present = "TRUE"
extendedConfigFile = "Windows 10 x64.vmxf"
floppy0.present = "FALSE"
gui.lastPoweredViewMode = "fullscreen"
pciBridge5.pciSlotNumber = "22"
pciBridge6.pciSlotNumber = "23"
pciBridge7.pciSlotNumber = "24"
usb.pciSlotNumber = "32"
ethernet0.pciSlotNumber = "160"
sound.pciSlotNumber = "33"
ehci.pciSlotNumber = "34"
usb_xhci.pciSlotNumber = "192"
sata0.pciSlotNumber = "35"
nvme0.pciSlotNumber = "224"
nvme0:0.redo = ""
svga.vramSize = "268435456"
vmotion.checkpointFBSize = "4194304"
vmotion.checkpointSVGAPrimarySize = "268435456"
vmotion.svga.mobMaxSize = "1073741824"
vmotion.svga.graphicsMemoryKB = "8388608"
vmotion.svga.supports3D = "1"
vmotion.svga.baseCapsLevel = "9"
vmotion.svga.maxPointSize = "189"
vmotion.svga.maxTextureSize = "16384"
vmotion.svga.maxVolumeExtent = "2048"
vmotion.svga.maxTextureAnisotropy = "16"
vmotion.svga.lineStipple = "1"
vmotion.svga.dxMaxConstantBuffers = "15"
vmotion.svga.dxProvokingVertex = "1"
vmotion.svga.sm41 = "1"
vmotion.svga.multisample2x = "1"
vmotion.svga.multisample4x = "1"
vmotion.svga.msFullQuality = "1"
vmotion.svga.logicOps = "1"
vmotion.svga.bc67 = "9"
vmotion.svga.sm5 = "1"
vmotion.svga.multisample8x = "1"
vmotion.svga.logicBlendOps = "1"
vmotion.svga.maxForcedSampleCount = "8"
vmotion.svga.gl43 = "1"
ethernet0.generatedAddressOffset = "0"
monitor.phys_bits_used = "45"
softPowerOff = "FALSE"
sata0:1.startConnected = "TRUE"
applianceView.coverPage.author = "emsec"
applianceView.coverPage.version = "1"
isolation.tools.hgfs.disable = "TRUE"
sharedFolder0.present = "FALSE"
sharedFolder0.enabled = "TRUE"
sharedFolder0.readAccess = "TRUE"
sharedFolder0.writeAccess = "TRUE"
sharedFolder0.guestName = "hostshare"
sharedFolder0.expiration = "never"
sharedFolder.maxNum = "0"
usb_xhci:4.present = "TRUE"
usb_xhci:4.deviceType = "hid"
usb_xhci:4.port = "4"
usb_xhci:4.parent = "-1"
PS C:\Users\emsec-pc\Desktop>
For example, let’s increase the memory from 4388 MB to 8192 MB. Before editing the .vmx file, it is important to ensure that the VM is powered off :
1
2
3
4
5
6
7
$vmx = "C:\VM\Win10\Windows 10 x64.vmx"

vmrun stop $vmx soft

(Get-Content $vmx) `
  -replace 'memsize\s*=\s*"\d+"', 'memsize = "8192"' |
Set-Content $vmx
This replaces memsize = “4388” with a higher value, for example 8192 MB.
Check changes:
1
2
3
4
5
PS C:\Users\emsec-pc\Desktop> Select-String -Path $vmx -Pattern 'memsize'

C:\VM\Win10\Windows 10 x64.vmx:37:memsize = "8192"

PS C:\Users\emsec-pc\Desktop>
This approach is particularly useful when cloning labs or preparing standardized VM templates.
Full Automation Example:
Here’s a PowerShell script for managing multiple VMware VMs interactively:
1
2
3
4
5
6
7
8
9
10
11
12
13
14
15
16
17
18
19
20
21
22
23
24
25
26
27
28
29
30
31
32
33
34
35
36
37
38
39
40
41
42
43
44
45
46
47
48
# VMware VM Manager (PowerShell)
# Author: EmSec
# Purpose: Easy management of VMware Workstation VMs via vmrun.exe

$VmRoot = "C:\VM"
$VmwarePath = "C:\Program Files (x86)\VMware\VMware Workstation"

# Ensure vmrun is available
if (-not (Get-Command vmrun -ErrorAction SilentlyContinue)) {
    if (Test-Path "$VmwarePath\vmrun.exe") { $env:Path += ";$VmwarePath" }
    else { Write-Error "vmrun.exe not found. Install VMware Workstation."; exit 1 }
}

# Get all VMX files
$Vms = Get-ChildItem $VmRoot -Recurse | Where-Object { $_.Extension -eq ".vmx" }

if ($Vms.Count -eq 0) { Write-Error "No .vmx files found."; exit 1 }

# Menu
Clear-Host
Write-Host "==== VMware Virtual Machines ====`n"
for ($i = 0; $i -lt $Vms.Count; $i++) { Write-Host "[$($i + 1)] $($Vms[$i].BaseName)" }
Write-Host "[S] Show running VMs`n[Q] Quit`n"

$Choice = Read-Host "Select VM number or option"

if ($Choice -match '^[Qq]$') { exit }
if ($Choice -match '^[Ss]$') { vmrun list; exit }
if ($Choice -notmatch '^\d+$' -or $Choice -lt 1 -or $Choice -gt $Vms.Count) { Write-Error "Invalid selection."; exit 1 }

$Vm = $Vms[$Choice - 1]
$VmPath = $Vm.FullName

# Action menu
Write-Host "`nSelected VM: $($Vm.BaseName)`n"
Write-Host "[1] Start (nogui)`n[2] Stop (soft)`n[3] Suspend`n[4] Resume`n[5] Reset`n[6] Check if running`n"

$Action = Read-Host "Choose action"

switch ($Action) {
    "1" { if (vmrun list | Select-String -Quiet $VmPath) { Write-Host "VM is already running." } else { vmrun start "$VmPath" nogui; Write-Host "VM started." } }
    "2" { vmrun stop "$VmPath" soft; Write-Host "VM stopped." }
    "3" { vmrun suspend "$VmPath"; Write-Host "VM suspended." }
    "4" { vmrun start "$VmPath" nogui; Write-Host "VM resumed." }
    "5" { vmrun -T ws reset "$VmPath"; Write-Host "VM reset." }
    "6" { if (vmrun list | Select-String -Quiet $VmPath) { Write-Host "VM is running." } else { Write-Host "VM is not running." } }
    default { Write-Error "Invalid action." }
}
Conclusion
Managing VMware Workstation from PowerShell transforms it from a desktop virtualization tool into a fully scriptable lab platform. With vmrun, you gain precise control over VM lifecycles, guest interaction, and automation workflows.
Once you adopt this approach, going back to manual GUI operations feels slow and limiting. Whether you are building security labs, testing software, or managing multiple operating systems locally, PowerShell-driven VMware automation is a skill worth mastering.