Active Directory Mastery - A Guide to Windows Server Setup for Penetration Testing
Setting Up a Windows Server for Penetration Testing with Active Directory
1. Introduction
Overview of the blog's purpose :
Welcome to the Active Directory Pentesting Blog, your ultimate guide for constructing a robust and secure Windows Server environment crafted specifically for penetration testing. Whether you’re a beginner or an experienced professional, this blog aims to offer a comprehensive guide to help you build your own penetration testing lab
Importance of a controlled environment for penetration testing :
In the realm of cybersecurity, the significance of a controlled environment for penetration testing cannot be overstated. A controlled environment provides a safe and isolated space where ethical hackers, security professionals, and enthusiasts can simulate real-world cyber threats without compromising the integrity of live systems. Here’s why it matters:
Risk Mitigation:
Enables safe exploration without the risk of damaging live systems.
- Realistic Scenarios:
Mimics real-world conditions, providing a close-to-reality testing environment.
Skill Development:
Offers a hands-on learning ground for system administration, network security, and ethical hacking.
Confidentiality and Compliance:
Protects sensitive data, ensuring compliance with regulatory requirements.
Iterative Testing:
Facilitates continuous improvement by refining strategies based on test outcomes.
Ethical Practices:
Promotes ethical and responsible hacking, emphasizing constructive use of hacking skills.
2. Lab Setup
Hardware and software requirements :
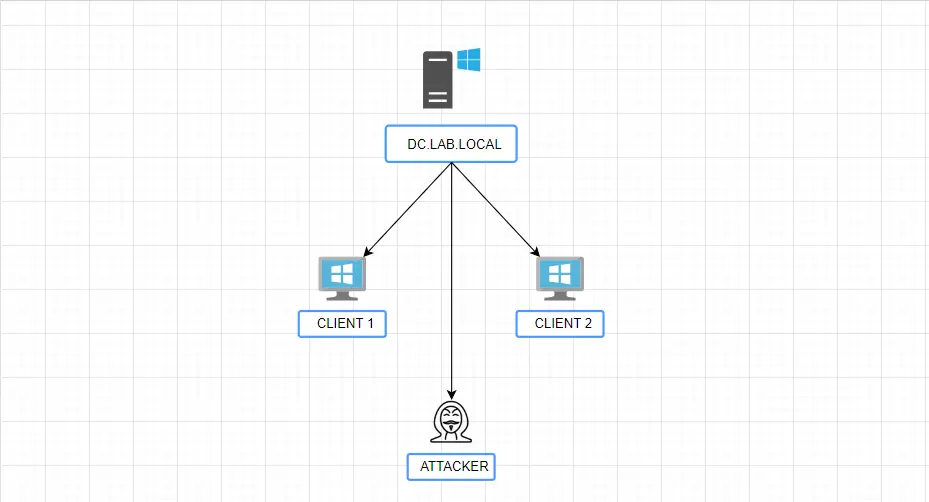
To establish a robust penetration testing lab with Windows Server 2012 as the Active Directory Domain Controller (AD DC) server, Windows 10 as the client machine, and Kali Linux for attacking, ensure your hardware and software meet the following requirements:
Hardware Requirements:
- Server Machine (Windows Server 2012 r2):
| Component | Specification |
|---|---|
Processor | Dual-core processor or higher. |
RAM | 2 GB or more. |
Storage | 50 GB or more for the operating system and additional space for virtual machines. |
- Client Machine (Windows 10):
| Component | Specification |
|---|---|
Processor | Dual-core processor or higher. |
RAM | 2 GB or more. |
Storage | 30 GB or more for the operating system and applications. |
- Attacking Machine (Kali Linux):
| Component | Specification |
|---|---|
Processor | Dual-core processor or higher. |
RAM | 2 GB or more. |
Storage | 30 GB or more for the operating system and tools. |
Software Requirements :
- Windows Server 2012 R2 :
You can Download ISO of Windows SERVER 2012 r1 from here
- Windows 10 :
You can Download Windows 10 from here
- Kali Linux :
Choose any OS for penetration testing; I recommend using Kali linux for optimal results.
Virtualization Platform :
Choose a virtualization platform like VMware Workstation Pro or VirtualBox for creating and managing virtual machines.
3. Basic Configuration
Configuration script :
Windows Server 2012 r2 :
| Component | Specification |
|---|---|
MACHINE NAME | SRV-1 |
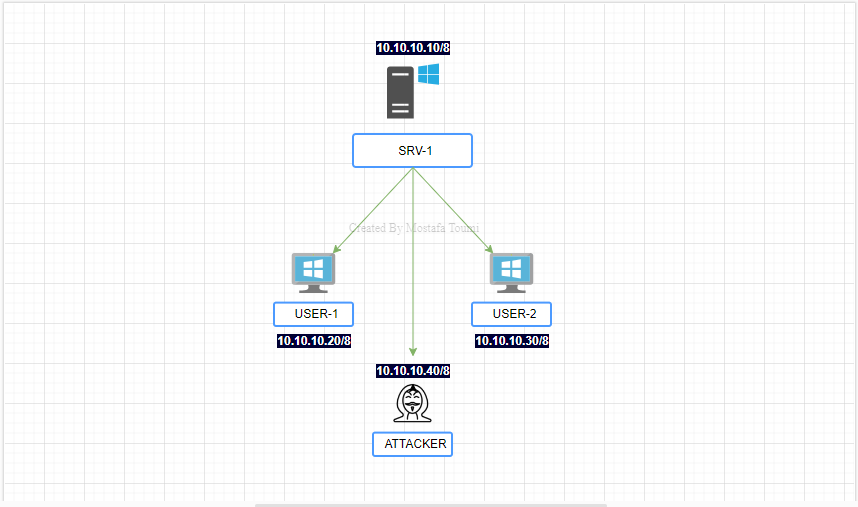
IPv4 Address | 10.10.10.10/8 |
Mask | 255.0.0.0 |
DNS | 127.0.0.1 (We will make changes to this in part 2 as we need to create a DNS server) |
ANTIVIRUS | ENABLE |
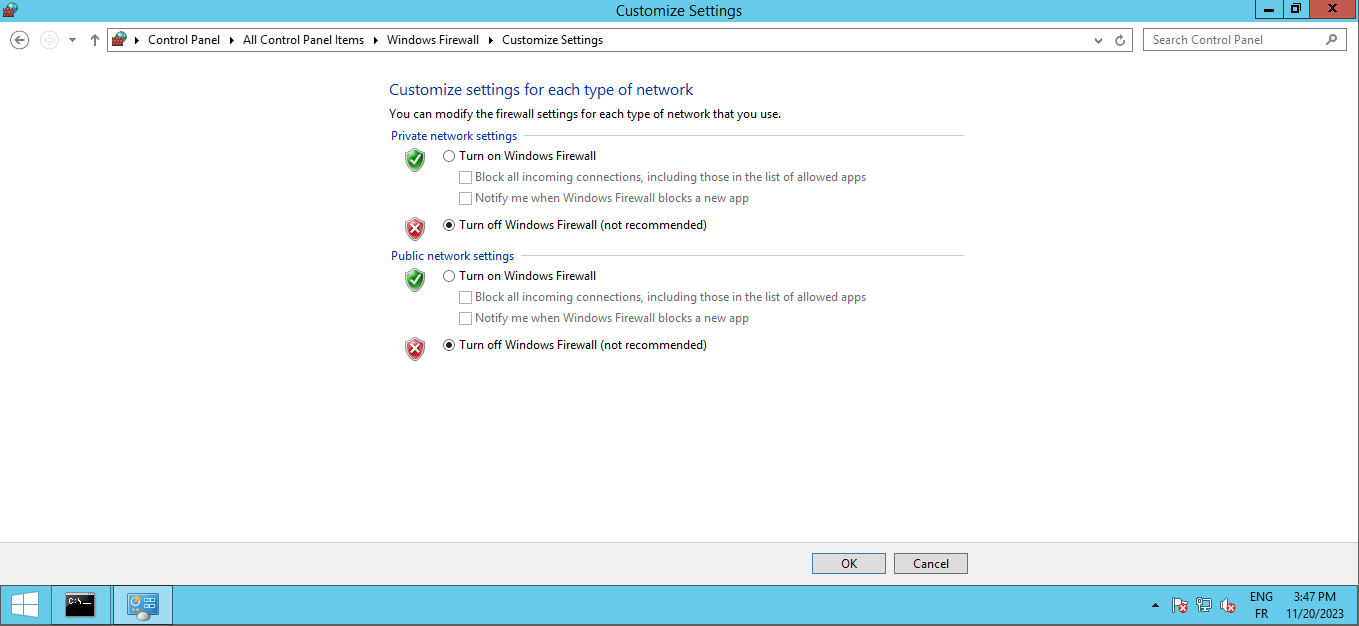
FIREWALL | DISABLE |
Why disable the firewall? Because the firewall might block ICMP connections between the host server and the client, as well as the client to the server. Alternatively, you would have to allow these ports through the firewall settings
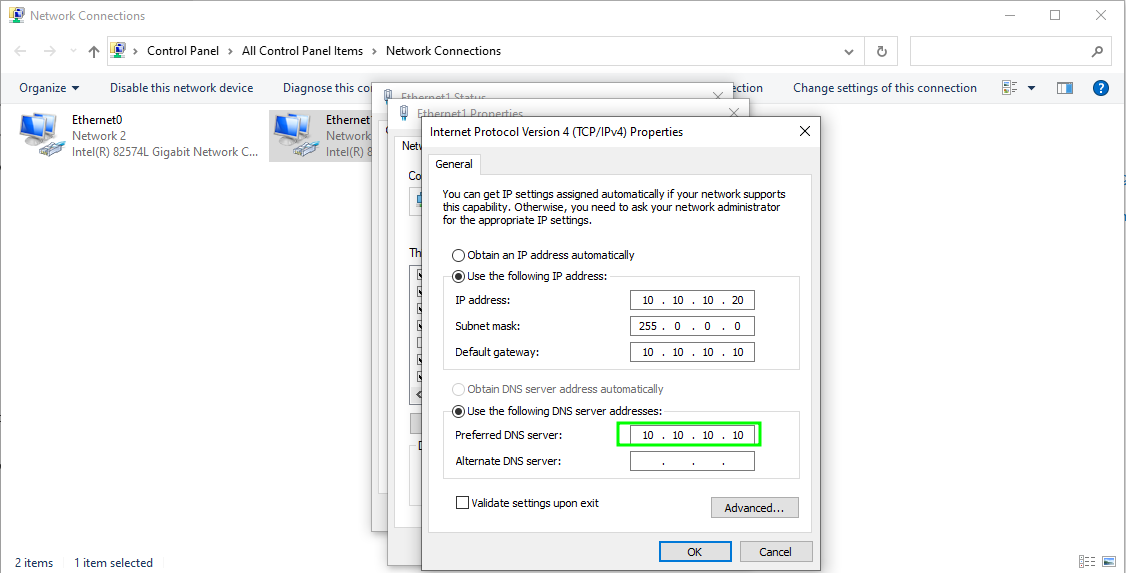
Windows 10 (clients) and kali linux :
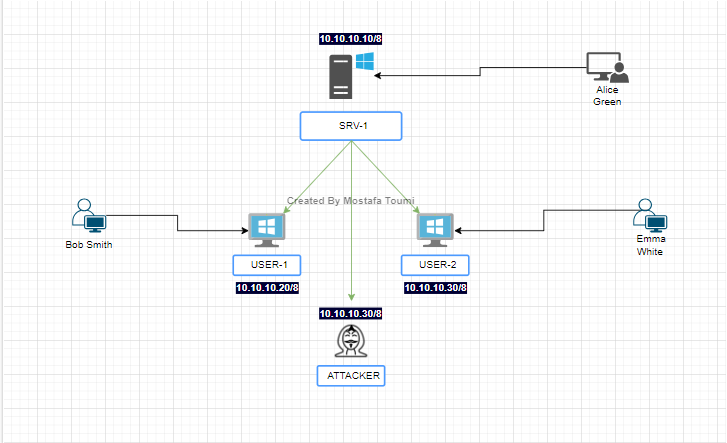
For simplicity, we will assign the following IP addresses: Client 1 - 10.10.10.20, Client 2 - 10.10.10.30, and Kali Linux - 10.10.10.40
Note : The DNS and default gateway will be set to the server’s address, which is 10.10.10.10.
I think that is clear. Now, let’s configure this setup
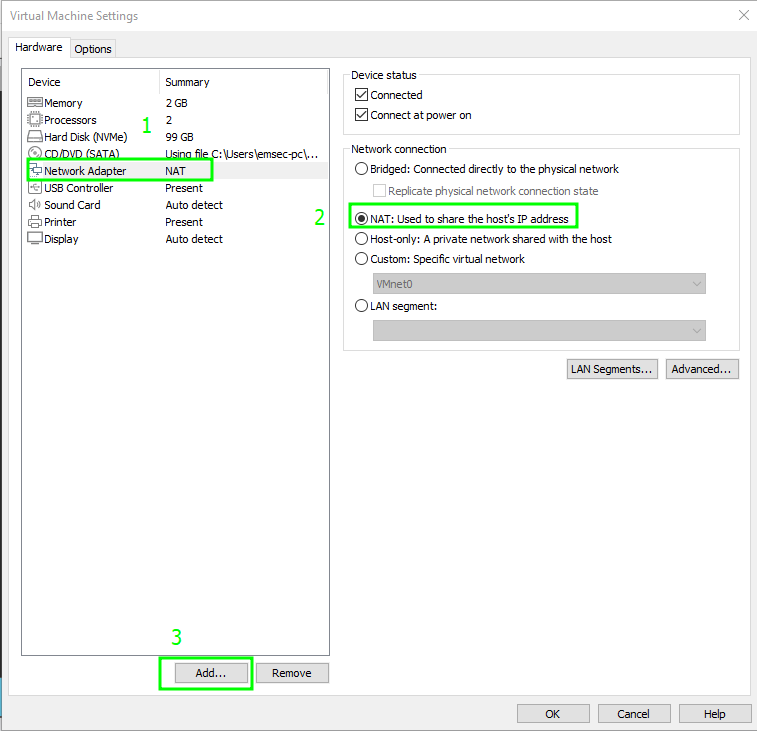
Adding Second Interface in VMware :
After installing Windows Server 2012, Windows 10, and Kali Linux, the next step is to configure the network. Create a second bridged virtual network adapter directed to the second card and add it to the Virtual Machine. Why? This is done to isolate this LAN segment, enabling seamless communication among these machines. The first interface ensures internet connectivity for downloading or upgrading system components.
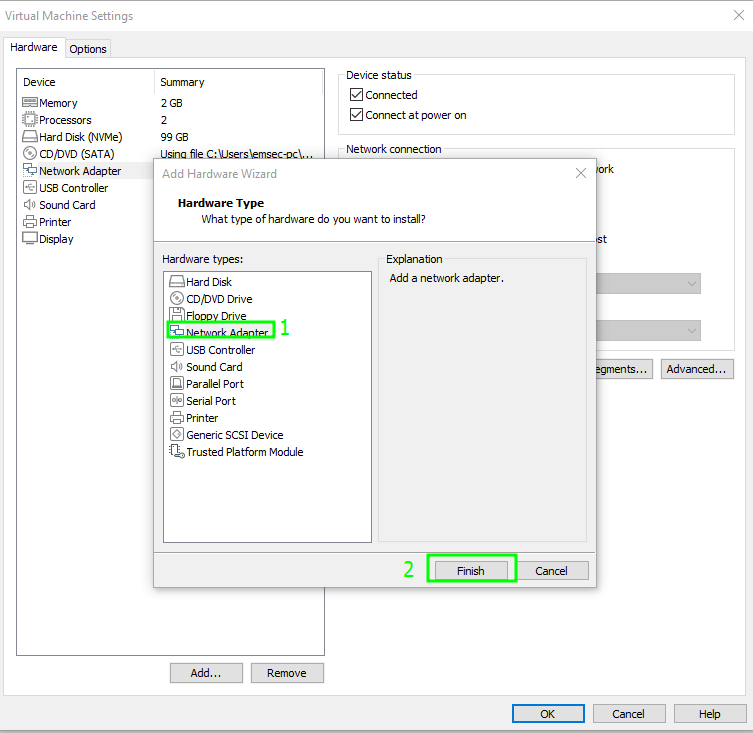
To add a new network adapter, navigate to Settings of SRV Machine > click add (make sure the first interface is NAT for Internet connection)
Select Network Adapter and click Finish
 Create a LAN Segment called ‘LAB.LOCAL’
 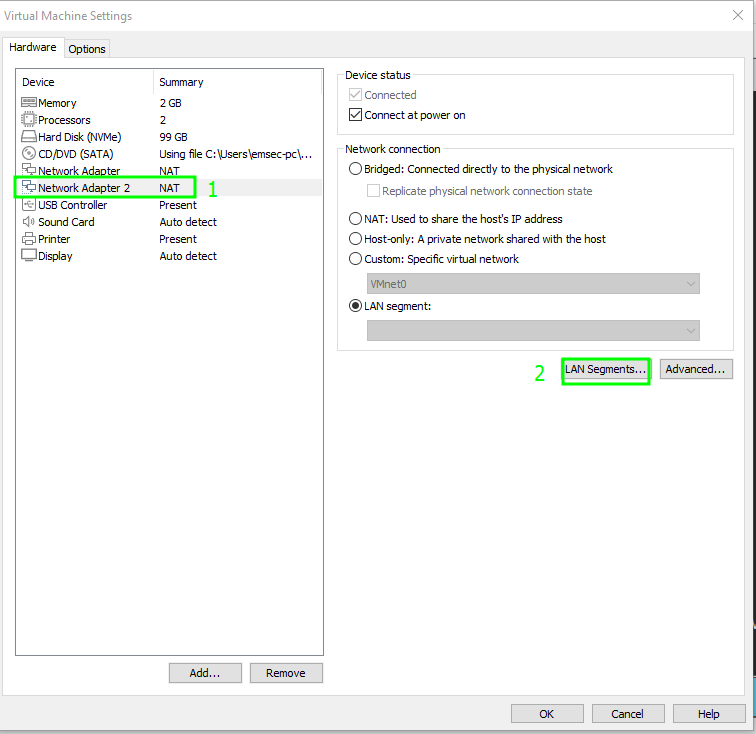 Link This LAN segment with the second interface
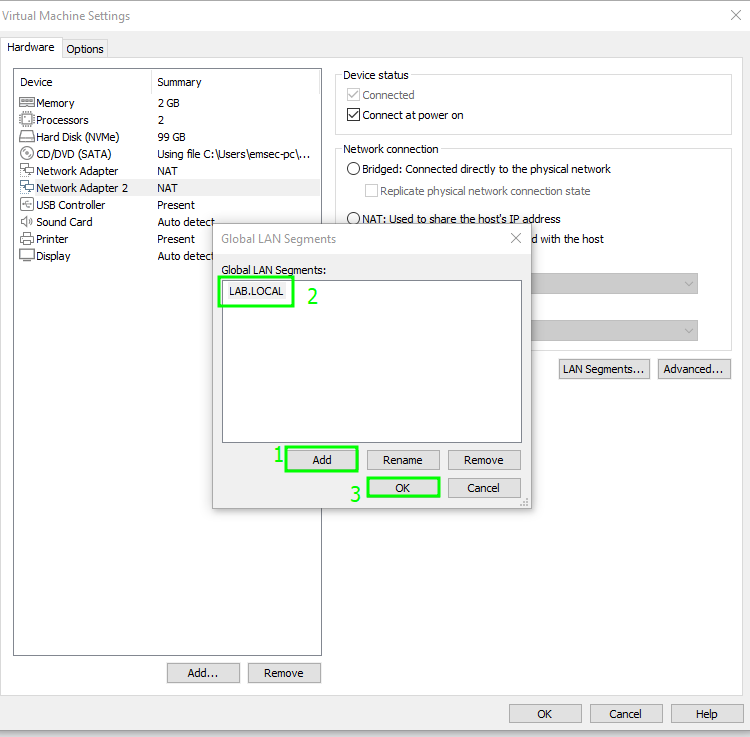
Note : You can follow the same previous steps for all machines.
Configuring networking (static IP, DNS settings).
Windows Server 2012 r2 :
By default Ethenet0 is the first interface and the second interface that we added is Ethernet1 . To set a static IP for Ethernet1 in Windows using CMD, you can use the following commands (win + R & cmd ):

1
2
3
4
5
6
7
#IP Address
netsh interface ipv4 set address name="Ethernet1" static 10.10.10.10 255.0.0.0 10.10.10.1
#DNS
netsh interface ipv4 set dns name="Ethernet1" static 127.0.0.1

#Changeing Name of Machine
netdom renamecomputer %COMPUTERNAME% /newname:SRV-1 /reboot:0

1
2
3
4
5
#To disable Firewall
netsh advfirewall set allprofiles state off
#If you want to enable it later
netsh advfirewall set allprofiles state on
Windows 10 (Clinet-1 & Clinet-2):
- Client-1 :
1
2
3
4
5
6
7
8
9
10
11
12
13
#IP Address
netsh interface ipv4 set address name="Ethernet1" static 10.10.10.20 255.0.0.0 10.10.10.10

#DNS (address of AD server)
netsh interface ipv4 set dns name="Ethernet1" static 10.10.10.10

# Changing Name of Machine
netdom renamecomputer %COMPUTERNAME% /newname:user-1 /reboot:0

#To disable Firewall
netsh advfirewall set allprofiles state off
#If you want to enable it later
netsh advfirewall set allprofiles state on
- Client-2 :
1
2
3
4
5
6
7
8
9
10
11
12
13
#IP Address
netsh interface ipv4 set address name="Ethernet1" static 10.10.10.30 255.0.0.0 10.10.10.10

#DNS (address of AD server)
netsh interface ipv4 set dns name="Ethernet1" static 10.10.10.10

# Changing Name of Machine
netdom renamecomputer %COMPUTERNAME% /newname:user-2 /reboot:0

#To disable Firewall
netsh advfirewall set allprofiles state off
#If you want to enable it later
netsh advfirewall set allprofiles state on
- Kali Linux :
1
2
3
4
5
6
# IP Address
sudo ifconfig eth1 10.10.10.40 netmask 255.0.0.0
# DNS
sudo ip route add default via 10.10.10.10 dev eth1
# Activate The Interface
sudo ip link set eth1 up
Testing The connectivity :
We have completed the basic configuration of the machines and the necessary settings. Now, it’s time to test the connectivity, ensuring it works both from the server to the client and from the client to the server.
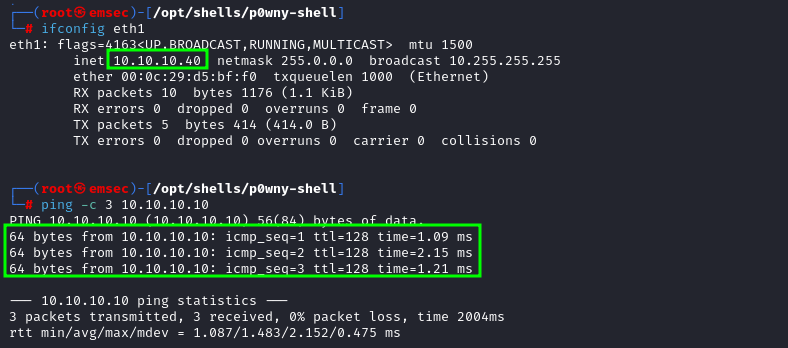
- From Kali linux to SRV1 :
The connection is successful between Kali Linux (attacker) and SRVE-1 (Windows Server 2012)
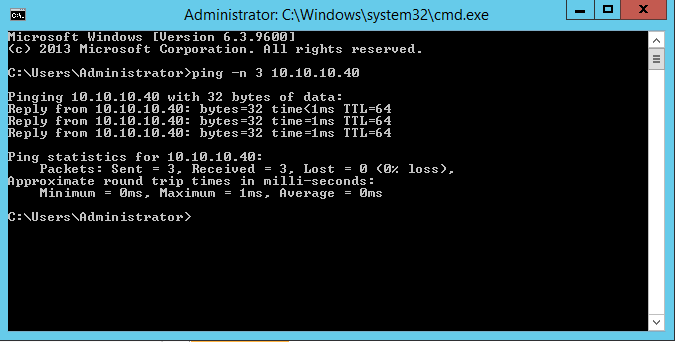
- From SRV1 To Kali:
It’s fine too
Note : If the connectivity fails, check the firewall settings as mentioned earlier.
You can follow the same steps to check the connectivity between the clients and SRVE-1, as well as with Kali Linux.
Diagram :
4. Active Directory Domain Controller Setup
Installing the Active Directory Domain Services role :
While Windows Server 2012 provides a graphical user interface (GUI) method for adding features such as the Active Directory module, we’ll take a detour and explore the command-line prowess of PowerShell. Why? Because embracing PowerShell not only enhances your scripting skills but also offers a more efficient and scalable way to manage and automate tasks. So, let’s skip the GUI this time and dive into the powerful world of PowerShell for our Active Directory module installation.
| Component | Specification |
|---|---|
Domain Name | DC.LAB.LOCAL |
Password | Pen_lab@2023! |
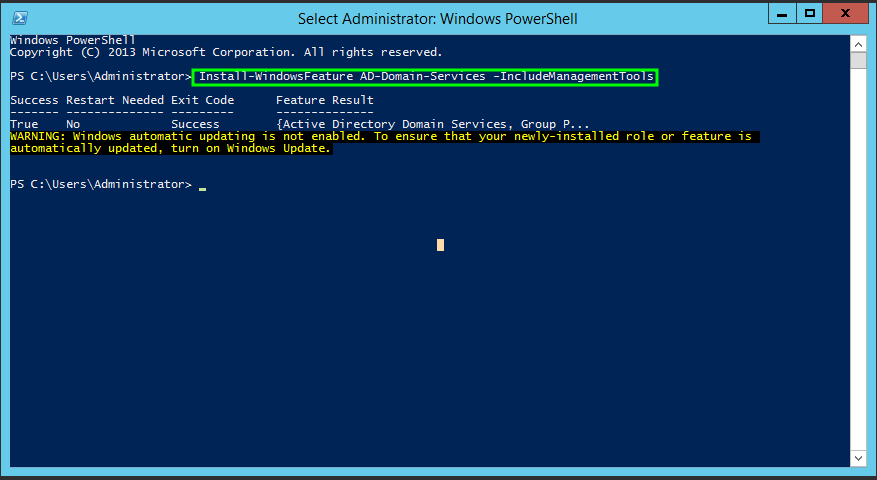
- Open PowerShell as Administrator
Right-click on the PowerShell icon and choose Run as Administrator to ensure elevated privileges.
- Install the Active Directory Module
1
Install-WindowsFeature AD-Domain-Services -IncludeManagementTools
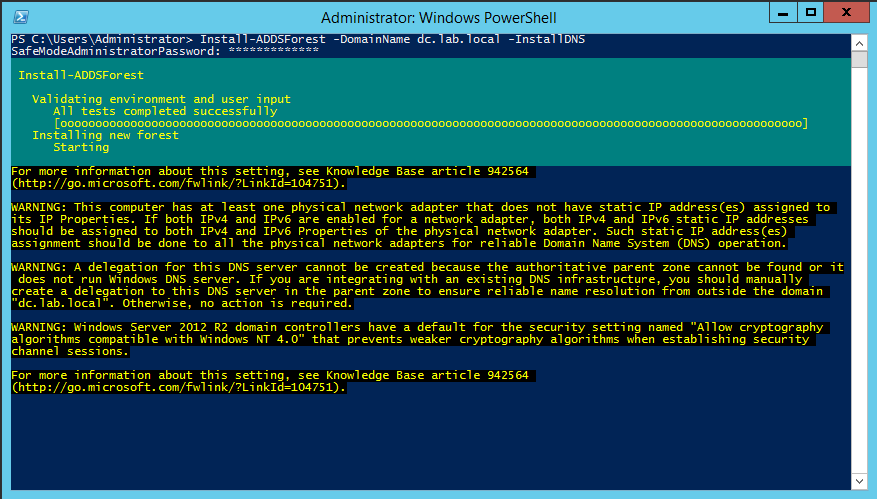
- Creating the domain and forest.
So, the domain name will be dc.lab.local, and the password is Pen_lab@2023!. The domain installation process may take from 2 to 5 minutes. During the installation, PowerShell will prompt you to restart the machine. Choose Y or Yes and wait until the installation completes and the machine reboots
1
Install-ADDSForest -DomainName dc.lab.local -InstallDNS
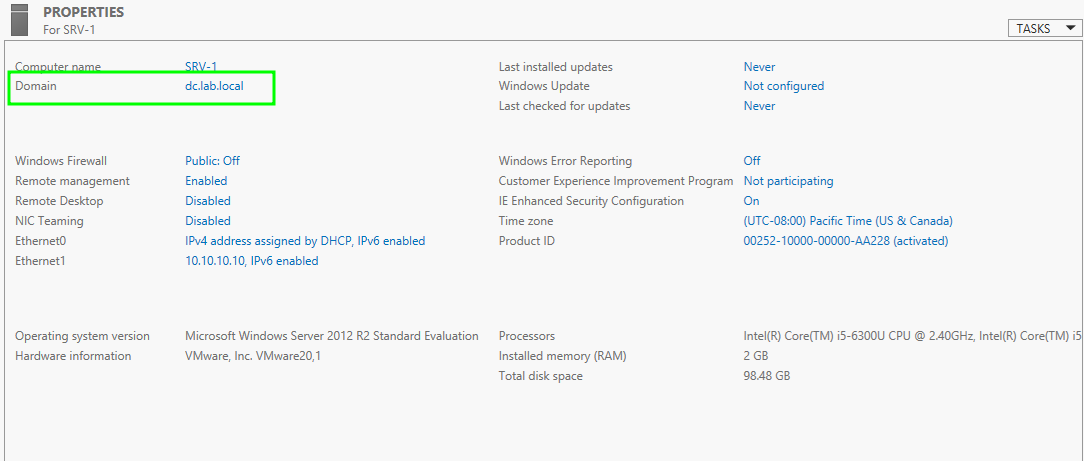
After the machine reboots, the name of our domain will appear in Server Manager under Local Server :
checking by Get-ADdoamin command, This will show you information about your new Domain :
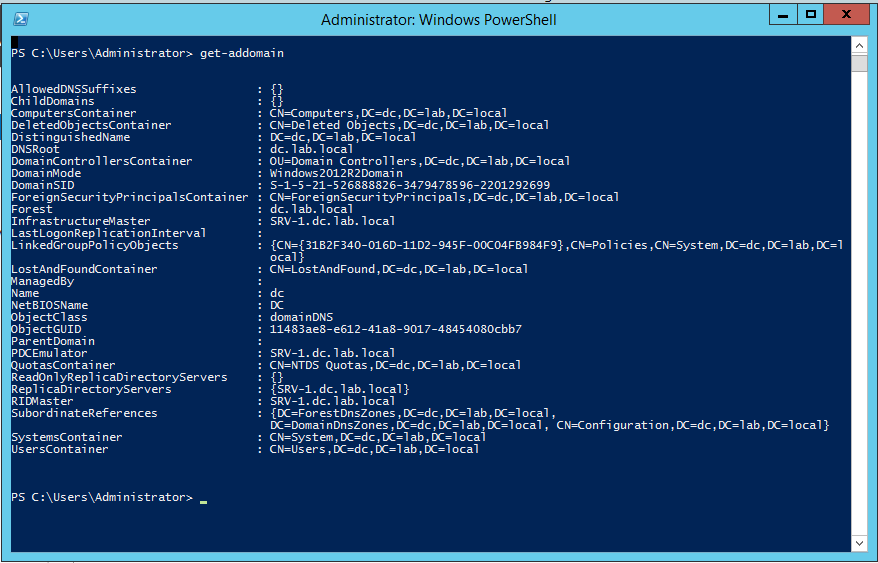
Now, everything looks great. We have successfully created our domain dc.lab.local. Let’s move on to the user and group management section.
5. User and Group Management
Adding users and groups to the domain :
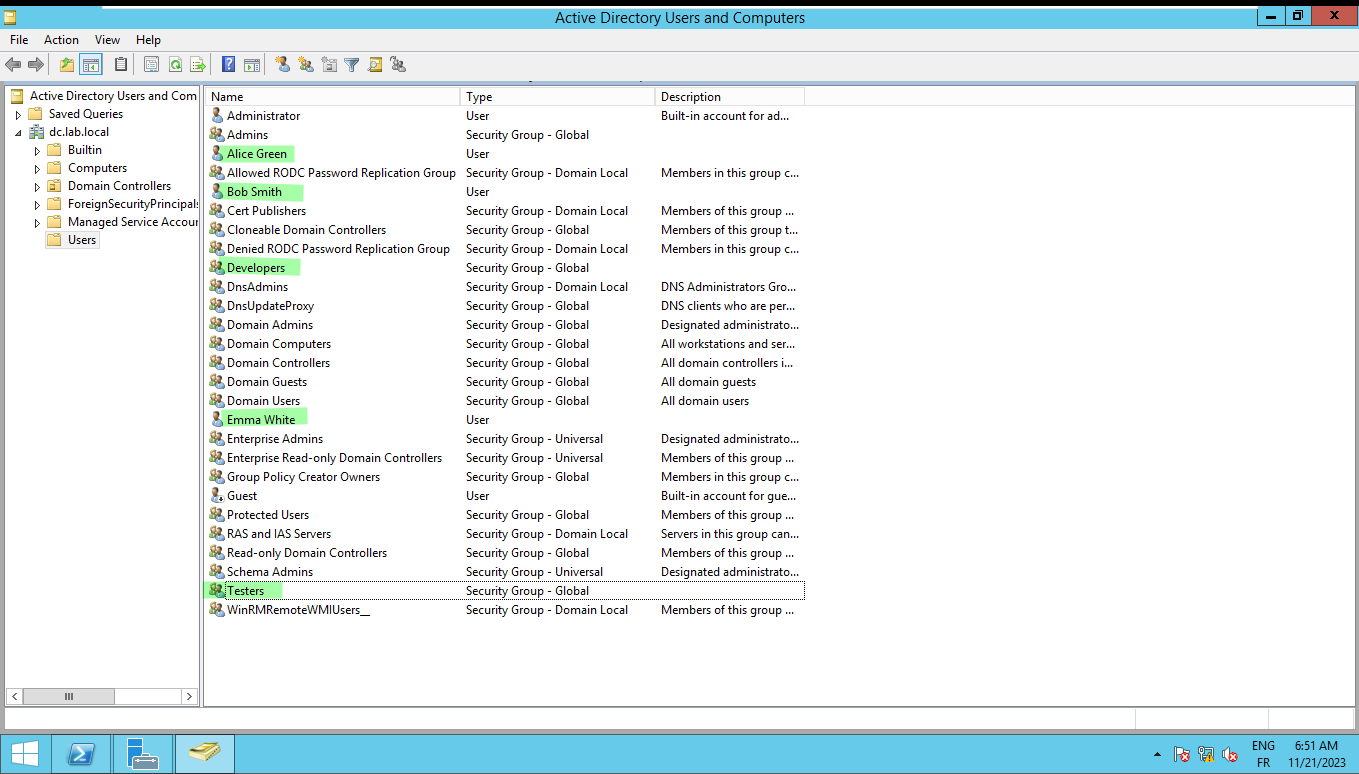
Now that our Active Directory is up and running, let’s dive into user and group management—a crucial aspect of network security. In this scenario, imagine we’re setting up a lab for a fictional organization called "TechSecure Corp."
User Creation :
User 1: Alice GreenUsername: alice.greenRole: Junior Administrator
User 2: Bob SmithUsername: bob.smithRole: Developer
User 3: Emma WhiteUsername: emma.whiteRole: QA Tester
1
2
3
4
5
# Create Users
New-ADUser -Name "Alice Green" -SamAccountName "alice.green" -UserPrincipalName "alice.green@techsecure.local" -Title "Junior Administrator" -Enabled $true -AccountPassword (ConvertTo-SecureString -AsPlainText "Alice@2023!" -Force)
New-ADUser -Name "Bob Smith" -SamAccountName "bob.smith" -UserPrincipalName "bob.smith@techsecure.local" -Title "Developer" -Enabled $true -AccountPassword (ConvertTo-SecureString -AsPlainText "Bob@2023!" -Force)
New-ADUser -Name "Emma White" -SamAccountName "emma.white" -UserPrincipalName "emma.white@techsecure.local" -Title "QA Tester" -Enabled $true -AccountPassword (ConvertTo-SecureString -AsPlainText "Emma@2023!" -Force)
Organizing Users into Groups :
- Group 1 : Admins
Members: Alice GreenPermissions: Full administrative access to servers and Active Directory.
- Group 2 : Developers
Members: Bob SmithPermissions: Access to development resources and shared project folders.
- Group 3 : Testers
Members: Emma WhitePermissions: Limited access to testing environments and relevant resources.
1
2
3
4
# Create Groups
New-ADGroup -Name "Admins" -GroupScope Global -GroupCategory Security
New-ADGroup -Name "Developers" -GroupScope Global -GroupCategory Security
New-ADGroup -Name "Testers" -GroupScope Global -GroupCategory Security
1
2
3
4
# Add Users to Groups
Add-ADGroupMember -Identity "Admins" -Members "alice.green"
Add-ADGroupMember -Identity "Developers" -Members "bob.smith"
Add-ADGroupMember -Identity "Testers" -Members "emma.white"
Assigning Appropriate Permissions :
File Server Permissions :
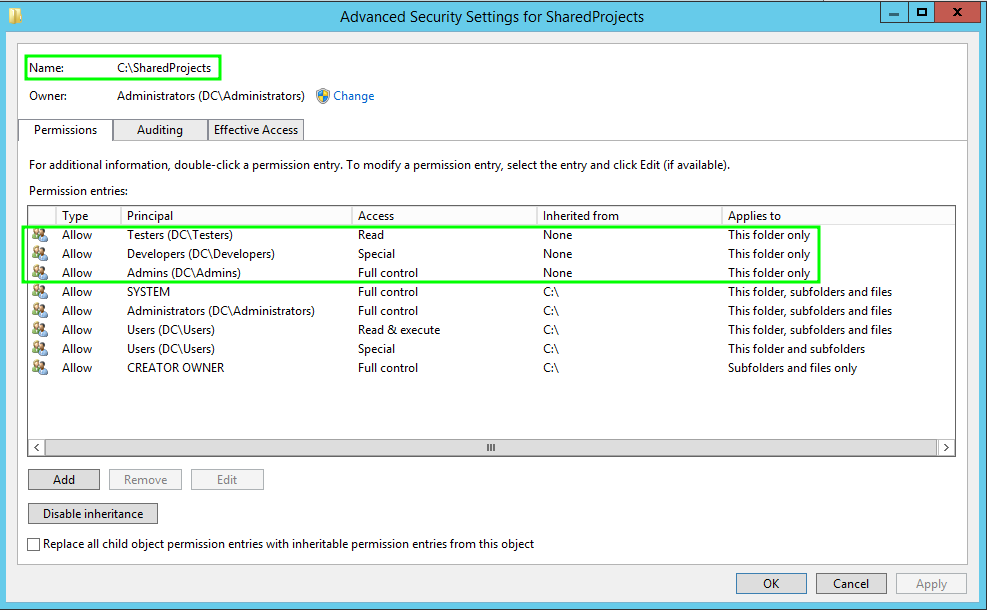
- Shared Project Folder :
Group Access: Developers have read/write access; Testers have read-only access.
- Admin Access :
Administrators: Full control over shared resources.
Active Directory Permissions :
- Admin Group:
Admins Group: Full control over Active Directory settings.
- User Management :
Developers Group: Limited user management capabilities for their team members.Testers Group: Basic user information access for their team members.
1
2
3
4
5
6
7
8
9
10
11
12
13
14
15
16
17
18
19
20
21
22
23
24
25

# Note  : This is a simplified example. In a real-world scenario, you would replace placeholders with actual file paths and server details.*

# Create Folder C:\SharedProjects
mkdir C:\SharedProjects

#Assume shared project folder is located at `"C:\SharedProjects"`

$projectFolderPath = "C:\SharedProjects"
$adminsGroup = Get-ADGroup -Filter {Name -eq "Admins"}
$developersGroup = Get-ADGroup -Filter {Name -eq "Developers"}
$testersGroup = Get-ADGroup -Filter {Name -eq "Testers"}

# Grant permissions on the shared project folder
# Administrators have full control
icacls $projectFolderPath /grant "$($adminsGroup.Name):(F)"
# Developers have read/write access
icacls $projectFolderPath /grant "$($developersGroup.Name):(R,W)"
# Testers have read-only access
icacls $projectFolderPath /grant "$($testersGroup.Name):(R)"

# Assign Active Directory Permissions
# Assume AD paths for user management and admin group
$userManagementPath = "OU=Users,DC=dc,DC=lab,DC=local"
$adminGroupPath = "CN=Admins,OU=Groups,DC=dc,DC=lab,DC=local"
The Admins group has full control, and the Testers have read permission on the C:\SharedProjects folder. However, Developers have special permissions. Even though we provide read and write permissions, what does that mean? Each file or folder has 18 types of permissions. Six of those are basic permissions visible under the Security tab, while the remaining 12 are advanced permissions exposed in advanced mode only. These advanced permissions are set automatically. Any modifications to the advanced permissions are flagged by a tick mark in the Special Permissions box.
Real-world Application :
*Scenario: Alice, a Junior Administrator, needs to create user accounts for new developers joining the team. She adds them to the Developers group, granting them the necessary permissions on the file server. Meanwhile, Bob, a Developer, requires access to project-related resources, which is facilitated through his group membership.*
This scenario provides a glimpse into how user and group management in Active Directory plays out in a practical setting. Stay tuned as we explore the dynamic realm of Group Policy Configuration in the upcoming blog post!
Diagram :
6. Move Users To an Organizational Unit
An OU is a container within a Microsoft Windows Active Directory (AD) domain that can hold users, groups and computers. It is the smallest unit to which an administrator can assign Group Policy settings or account permissions.
To streamline the application of Group Policy Objects (GPO), we need to create two Organizational Units (OUs), one for developers and another for QA Tester users. Let’s proceed with this configuration.
1
2
3
4
# Create Developers OU
New-ADOrganizationalUnit -Name "Developers" -Path "DC=dc,DC=lab,DC=local"
# Create QA Testers OU
New-ADOrganizationalUnit -Name "QA Testers" -Path "DC=dc,DC=lab,DC=local"
With the OUs added, our next step is to move users into their respective OUs.
1
2
3
4
# Moving emma.white user to QA Testers OU
 Get-ADUser -Identity "emma.white" | Move-ADObject -TargetPath "OU=QA Testers,DC=dc,DC=lab,DC=local"
 # Move bob.smith user to Developers OU
 Get-ADUser -Identity "bob.smith" | Move-ADObject -TargetPath "OU=Developers,DC=dc,DC=lab,DC=local"
We have successfully added users to OUs. Let’s proceed to the Group Policy Objects (GPO) section. 
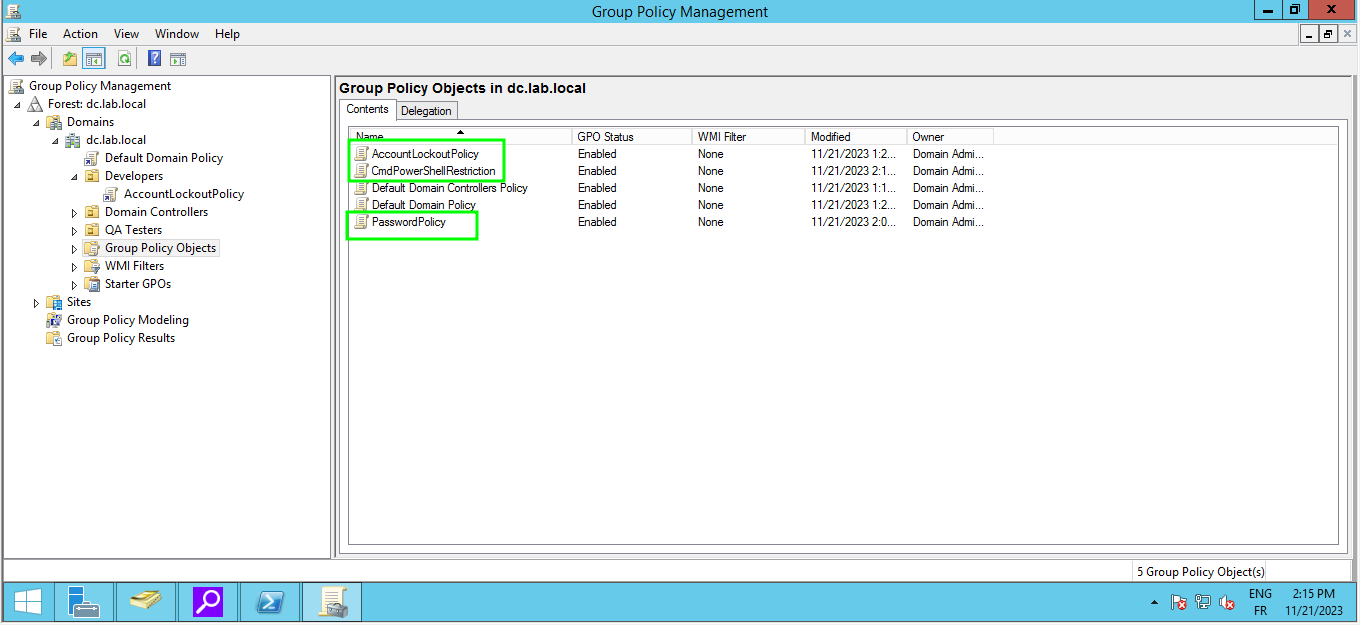
7. Group Policy Configuration
As we continue our journey through Active Directory mastery, we arrive at the fascinating realm of Group Policy Configuration. In this scenario, we’re tasked with enhancing the security posture of TechSecure Corp, our fictional organization.
Creating and Applying Group Policies for Security :
Password Complexity Policy :
Strengthen password security to thwart unauthorized access
| Syntax | Description |
|---|---|
Group Policy Setting | 1.Creating a Group Policy Object (GPO) named PasswordPolicy. |
| 2.Configuring the password complexity settings : | |
| - Minimum password length: 10 characters. | |
| - Require at least one uppercase letter, one lowercase letter, one digit, and one special character. | |
Application | Apply this GPO to the entire domain to enforce consistent password policies. |
1
2
3
4
5
6
7
8
9
10
11
# Creating Password Complexity Policy GPO
New-GPO -Name "PasswordPolicy"
$PasswordPolicyGPO = Get-GPO -Name "PasswordPolicy"
Set-GPRegistryValue -Guid $PasswordPolicyGPO.Id -Key "HKLM\SOFTWARE\Microsoft\Windows\CurrentVersion\Policies\System" -ValueName "MaxPasswordAge" -Type DWord -Value 0

# Link the GPO to the domain
$domainName = "dc.lab.local"
$gpoName = "PasswordPolicy"
$gpo = Get-GPO -Name $gpoName
New-GPLink -Name $gpo.DisplayName -Target $domainName -LinkEnabled Yes
Account Lockout Policy:
Mitigate the risk of brute force attacks by implementing account lockout measures.
| Syntax | Description |
|---|---|
Group Policy Setting | 1. Create a GPO named AccountLockoutPolicy. |
2. Set account lockout threshold to 3 invalid login attempts, with a lockout duration of 15 minutes. | |
Application | Apply this GPO to the domain controllers to safeguard against unauthorized access attempts. |
1
2
3
4
5
6
7
8
9
10
11
# Creating Account Lockout Policy GPO
New-GPO -Name "AccountLockoutPolicy"
$AccountLockoutPolicyGPO = Get-GPO -Name "AccountLockoutPolicy"
Set-GPRegistryValue -Guid $AccountLockoutPolicyGPO.Id -Key "HKLM\SOFTWARE\Microsoft\Windows\CurrentVersion\Policies\System" -ValueName "LockoutDuration" -Type DWord -Value 900

# Linking GPO to specific OUs
$ouDistinguishedName = "OU=Developers,DC=dc,DC=lab,DC=local"
$gpoName = "AccountLockoutPolicy"
$gpo = Get-GPO -Name $gpoName
New-GPLink -Name $gpo.DisplayName -Target $ouDistinguishedName -LinkEnabled Yes
Restricting Command-Line Access :
Employees in the RestrictedUsers group should be denied access to cmd and PowerShell. So we need to Limit command-line access for certain users to prevent misuse.
| Syntax | Description |
|---|---|
Group Policy Setting | 1.Creating a GPO named CmdPowerShellRestriction |
2.Utilizing the Software Restriction Policies under Windows Settings to create a path rule denying execution for cmd.exe and powershell.exe for the RestrictedUsers group. | |
Application | Applying this GPO specifically to the RestrictedUsers group to enforce the restriction. |
1
2
3
4
5
6
7
8
9
10
# Creating Restricting Command-Line Access GPO
New-GPO -Name "CmdPowerShellRestriction"
$CmdPowerShellRestrictionGPO = Get-GPO -Name "CmdPowerShellRestriction"

Set-GPRegistryValue -Guid $CmdPowerShellRestrictionGPO.Id -Key "HKLM\SOFTWARE\Policies\Microsoft\Windows\Safer\CodeIdentifiers\0\Paths" -ValueName "C:\Windows\System32\cmd.exe" -Type DWord -Value 0x4
Set-GPRegistryValue -Guid $CmdPowerShellRestrictionGPO.Id -Key "HKLM\SOFTWARE\Policies\Microsoft\Windows\Safer\CodeIdentifiers\0\Paths" -ValueName "C:\Windows\System32\WindowsPowerShell\v1.0\powershell.exe" -Type DWord -Value 0x4

# Linking GPO to the "QA testers" OU
$OUDistinguishedName = "OU=QA testers,DC=dc,DC=lab,DC=local"  # Replace with your actual OU
New-GPLink -Name "CmdPowerShellRestrictionLink" -Target $OUDistinguishedName -LinkEnabled Yes -GPOName "CmdPowerShellRestriction"
To force a Group Policy update on a local machine, you can use the following command:
1
2
3
gpupdate /force
# Or
Invoke-GPUpdate -Computer ComputerName -Force
Note : Ensure to perform this step on every local machine (both clients) to update the Group Policy Objects (GPO) promptly.
8. Adding Machines to the Domain
As we progress in our Active Directory journey, the next phase involves integrating client machines into the domain. This crucial step sets the foundation for a unified network under the watchful eye of our Active Directory infrastructure.
Preparing the Client Machine :
Ensure the client machine has a valid IP address and can communicate with the domain controller.

Confirm that the DNS settings on the client point to the Active Directory domain controller.
Joining the Domain:
To join a machine to a domain in Windows, we use use the Add-Computer PowerShell cmdlet :
1
2
Add-Computer -DomainName dc.lab.local -Credential dc.lab.local\Administrator -Restart
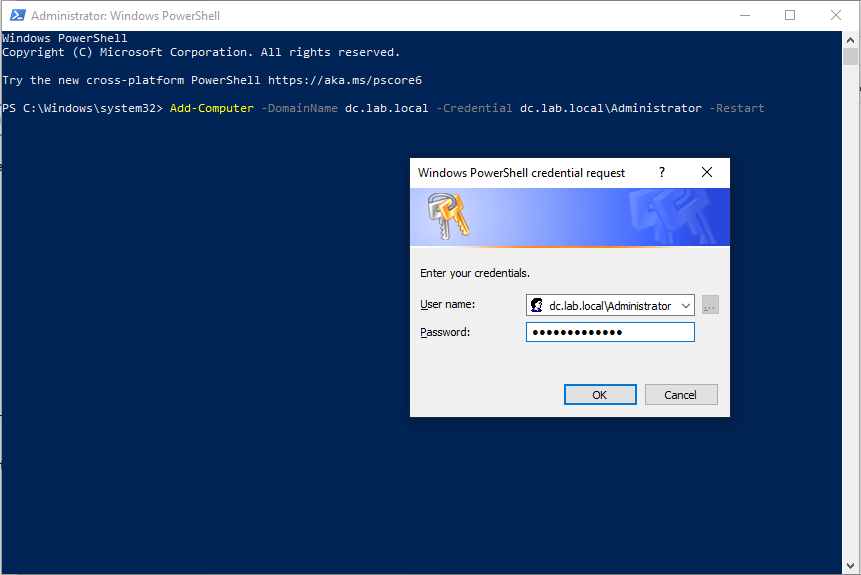
If everything is alright, the machine will restart, indicating that we have successfully added the machine user-1 to our domain dc.lab.local.
Verification:
After the machine has restarted, we can now log in with our user that we just added to the domain: bob.smith with the password Bob@2023!
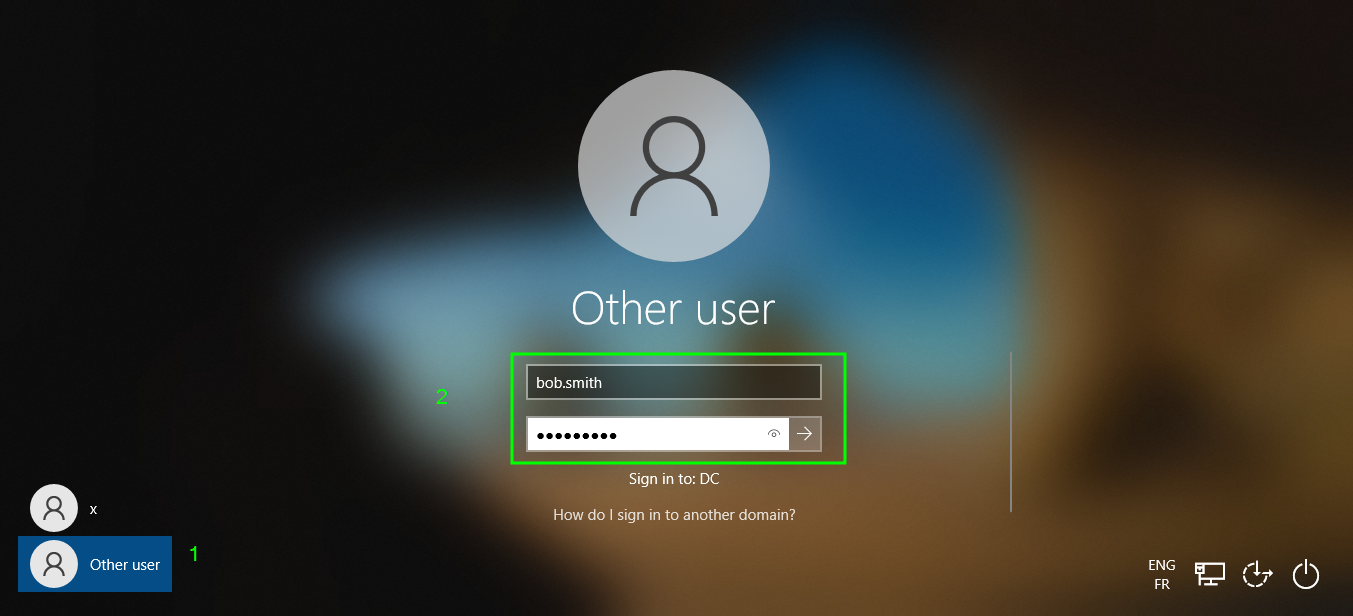
And in just a few minutes, the account setup will be complete.
Verify the machine’s domain membership in the Acive Directory Users and Computers :

Scenario : Bob, a Developer, is tasked with joining his Dev machine to the domain. Following the outlined steps, He is successfully integrates the machine into the TechSecure Corp domain.
You can follow the same steps to add client 2 to the domain.
9. Pentesting Tools Installation
As we gear up for the exciting realm of penetration testing, the installation of essential tools becomes paramount. This segment focuses on deploying common penetration testing tools such as Bloodhound, impacket and Wireshark, ensuring our arsenal is well-equipped for comprehensive security assessments.
I have created a table of tools that we will use in part two of this blog.
| Tools | Description |
|---|---|
| Impacket | Impacket is a collection of Python classes for working with network protocols. |
| PowerSploit | PowerSploit is a collection of Microsoft PowerShell modules that can be used to aid penetration testers during all phases of an assessment. |
| SharpCollection | SharpCollection, Nightly builds of common C# offensive tools, |
10. Conclusion
As we wrap up our Active Directory journey for penetration testing, let’s take a moment to reflect on the key steps and considerations that have shaped our exploration. This concluding chapter serves as a compass, guiding us through the intricate terrain of securing our network environment.
Recap of Key Steps:
Active Directory Domain Controller Setup: Successfully installed and configured the Active Directory Domain Controller, establishing the foundation for our secure network.
User and Group Management: Implemented robust user and group management strategies, tailoring permissions and access based on roles within the organization.
Create Organizational Units (OU): Organized users by adding them to OUs, making it simpler to link them with Group Policy Objects (GPO).
Group Policy Configuration: Strengthened security through Group Policy Configuration, enforcing password complexity, account lockout policies, and even restricting command-line access for specific user groups.
Adding Machines to the Domain: Integrated client machines seamlessly into the domain, fostering a unified network environment.
Pentesting Tools Installation: Installed essential penetration testing tools like Impacket and Bloodhound , equipping our lab for comprehensive security assessments.
Encouragement:
As you embark on your penetration testing endeavors, remember that responsible and ethical use of your lab is paramount. Each step you take contributes to your growth as a cybersecurity professional, and your commitment to ethical hacking enhances the overall security landscape.
Congratulations on completing this Active Directory journey! May your future exploits be both challenging and enlightening. Stay curious, stay secure, and keep pushing the boundaries of your cybersecurity expertise.
Thank you for joining me on this adventure. Until our paths cross again in the vast realm of cybersecurity!